
Welcome back!!! We are at Part 3 and the final chapter of our blog series on Distributed Malware Prevention & Sandboxing for VCF with VMware vDefend. In the previous chapter, we activated the Malware Prevention Service, configured the Sandboxing environment and deployed SVMs for distributed enforcement, now let’s configure Advanced Threat Prevention (ATP) policies to visualize, correlate and prevent a threat campaign.
If you missed the earlier parts of this series, you can catch up here:
Part 1: Distributed Malware Prevention and Sandboxing Architecture
https://vxplanet.com/2026/09/20/distributed-malware-prevention-sandboxing-for-vcf-with-vmware-vdefend-part-1-architecture/
Part 2: Distributed Malware Prevention and Sandboxing Deployment
https://vxplanet.com/2026/10/05/distributed-malware-prevention-sandboxing-for-vcf-with-vmware-vdefend-part-2-deployment/
Let’s get started:
Onboarding Workloads
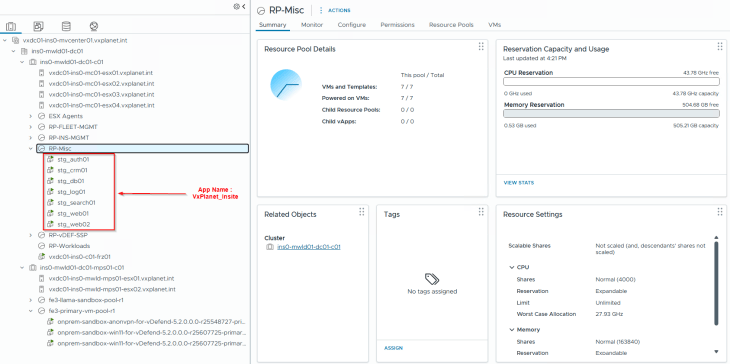
For this demonstration, I have onboarded an application called VxPlanet_Insite comprised of the below application tiers:
- Web Tier (stg_web01 and stg_web02)
- Search Tier (stg_search01)
- Logging Tier (stg_log01)
- Database Tier (stg_db01)
- CRM Tier (stg_crm01)
- Authentication Tier (stg_auth01)
This application is already microsegmented and onboarded to SSP using DFW 1-2-3-4 with strict controls against lateral movement, and as such, we will not be covering the detailed application blueprint in this article. For more details on application microsegmentation using DFW 1-2-3-4, please check out my previous article below:
Installing File Introspection Drivers on the Workload VMs
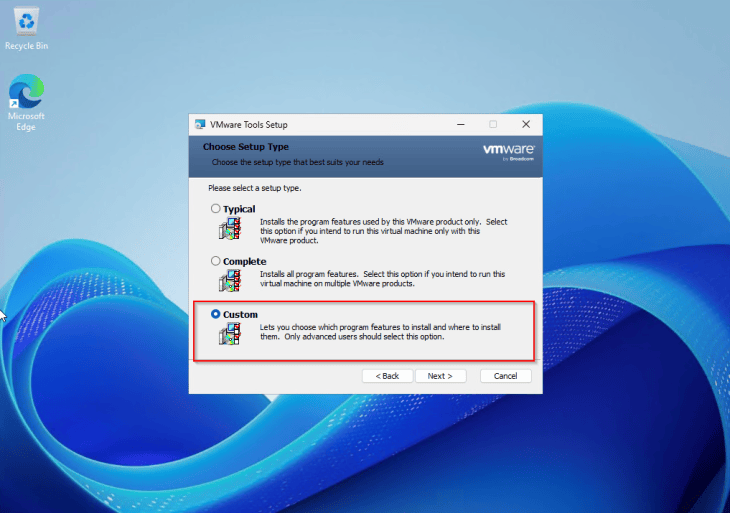
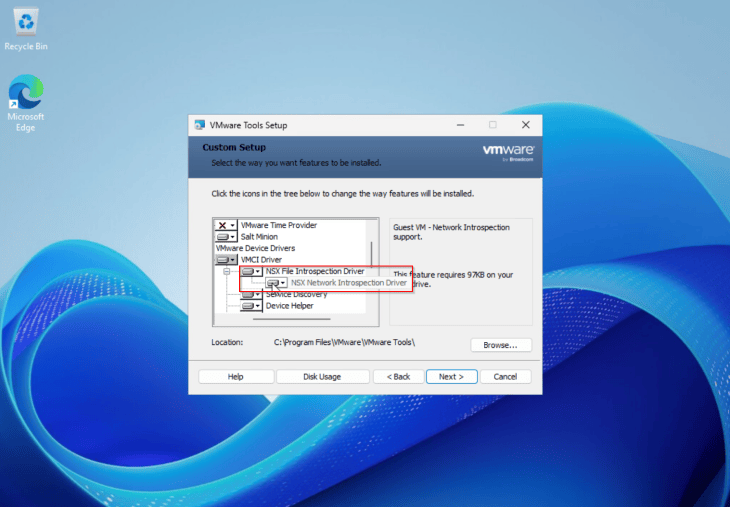
To protect our application VMs using Distributed Malware Prevention Service, we first need to install the Guest Introspection File drivers. While these drivers are bundled with VMware Tools, they are not part of the default setup and require a custom installation.
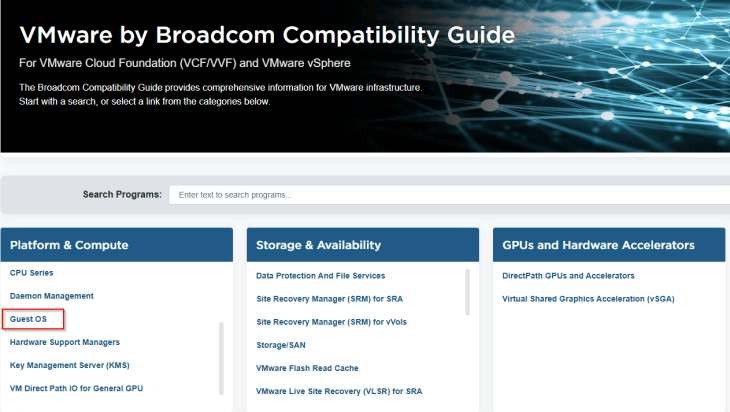
As a pre-requisite, it’s strongly recommended to review the guest VM OS compatibility with both ESXi version and VMware Tools version from the Broadcom Compatibility Matrix portal at https://compatibilityguide.broadcom.com
The official Broadcom documentation (links below) provides step-by-step instructions for installing these drivers on both Windows and Linux operating systems:
Windows:
https://techdocs.broadcom.com/us/en/vmware-security-load-balancing/vdefend/security-services-platform/5-2/malware-prevention/using-malware-prevention-on-a-distributed-firewall/prerequisites-for-deploying-distributed-malware-prevention-service/install-file-drivers-on-windows-virtual-machines.html
Linux:
https://techdocs.broadcom.com/us/en/vmware-security-load-balancing/vdefend/security-services-platform/5-2/malware-prevention/using-malware-prevention-on-a-distributed-firewall/prerequisites-for-deploying-distributed-malware-prevention-service/install-guest-introspect-drivers-for-linux-virtual-machines.html
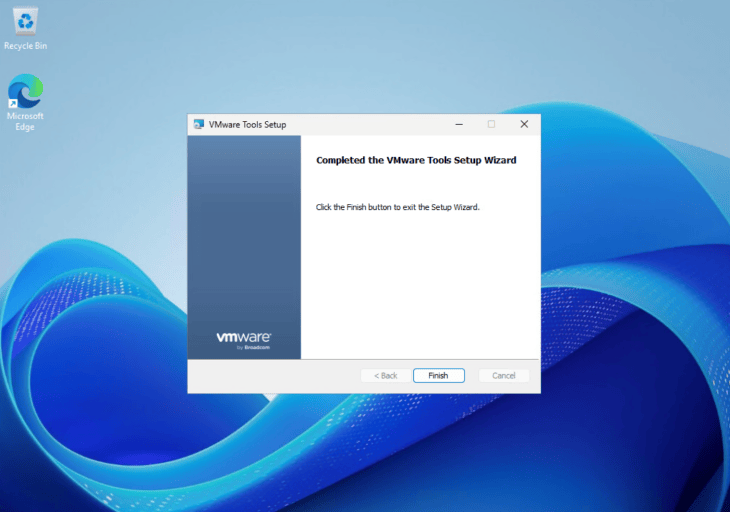
Since our application VxPlanet_Insite is Windows based, we will perform a custom installation of VMware Tools on all the application VMs.
Configuring ATP policies – Detect mode
While the main focus of this series is the Malware Prevention component of vDefend ATP, we are also going to activate the full ATP suite – IDPS, NTA and NDR so that we can visualize and correlate the entire threat lifecycle end-to-end.
Let’s configure Malware Prevention and IDPS rules for the application VxPlanet_Insite in Detect mode. We will change the rule action to Detect & Prevent a bit later in the walkthrough.
Malware Detection Rules
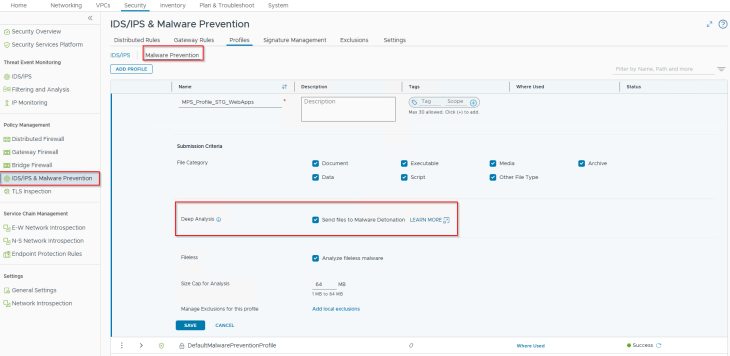
First, we will configure a dedicated Malware Prevention profile for our application with all the file categories included for submission. We will also enable Deep Analysis (Sandboxing) on this profile so that any files that do not receive a definitive verdict during local static analysis are automatically forwarded for sandboxing.
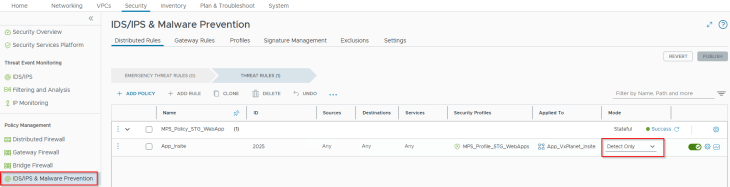
Next, let’s create the following MPS rule for the application. We will set the action to Detect and restrict the Applied-To scope specifically to the application itself.
Intrusion Detection Rules
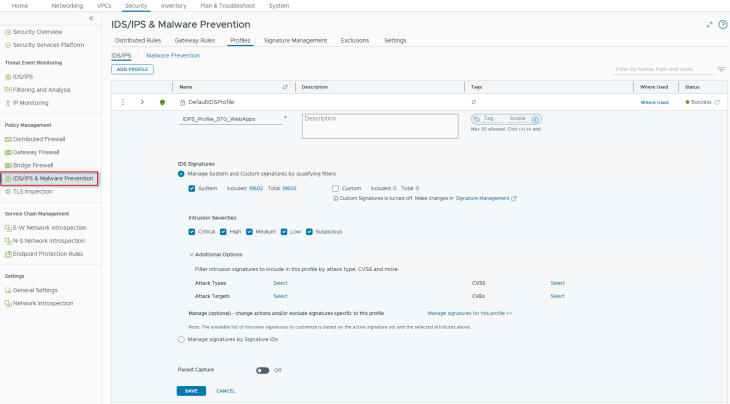
Similar to Malware Prevention profile, we will configure a separate Intrusion Detection and Prevention profile for our application that includes all signatures and severities.
We will then create the following IDPS rule for the application, again setting the action to Detect and the Applied-To scope directly to the application itself.
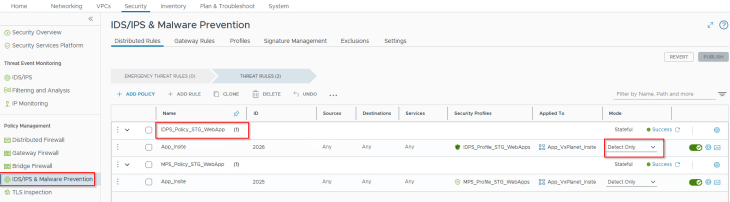
Because both policies are currently running in Detect mode, they will identify and flag potential intrusions, exploits, and malware activity without actively blocking any traffic.
Activating Network Traffic Analysis Detectors
We will now activate Network Traffic Analysis (NTA) and it’s detectors to analyse the application flow data for any behavioral anomalies and suspicious traffic. As of the SSP 5.2 release, we have 19 NTA detectors available, and a detailed description of these detectors is available in the official documentation at:
https://techdocs.broadcom.com/us/en/vmware-security-load-balancing/vdefend/security-services-platform/5-2/network-traffic-analysis/supported-detectors.html
Note that some of these detectors have a learning period to baseline normal behavior. For example the detector named Destination IP Profiler has a learning period of 10 days but the detector DNS Tunneling doesn’t require a learning period and can work immediately. For this reason, it’s recommended to activate these detectors as soon as you enable Security Intelligence feature, so that you get sufficient time to profile the application baseline behaviour before configuring ATP policies. Since this is a lab environment, we will simply acknowledge this requirement.
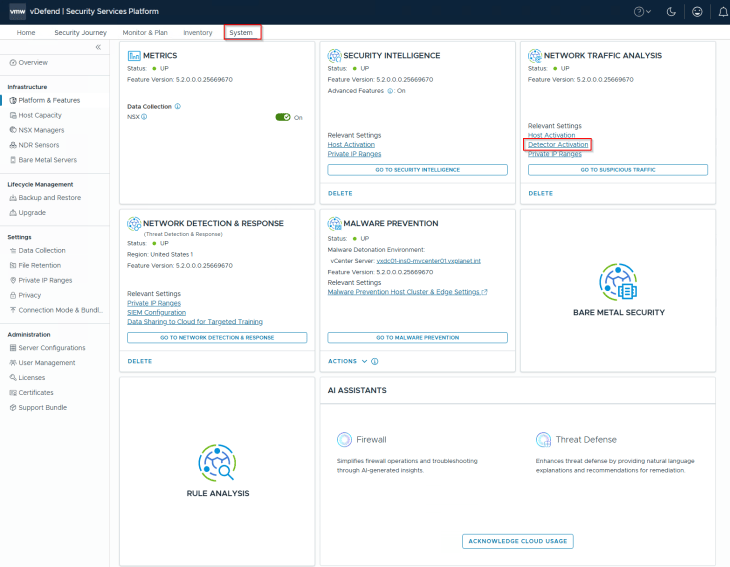
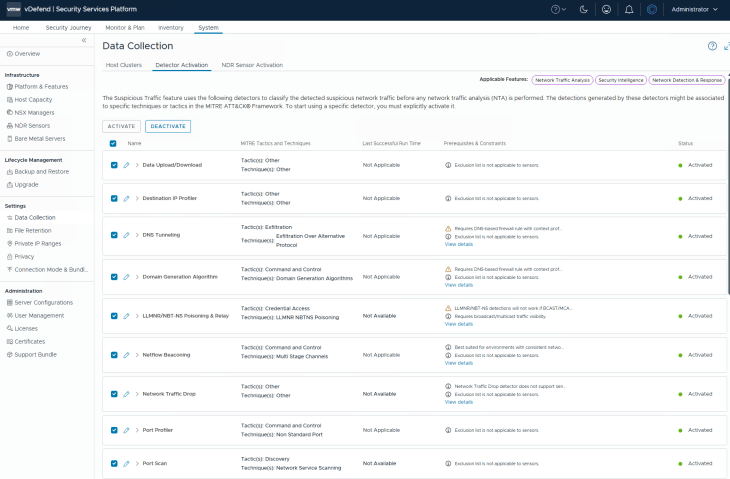
L7 detectors require DNS snooping to be enabled in DFW to dynamically lookup IP addresses from FQDNs. To accommodate this, we will create an L7 DNS rule under the DFW Infrastructure category.
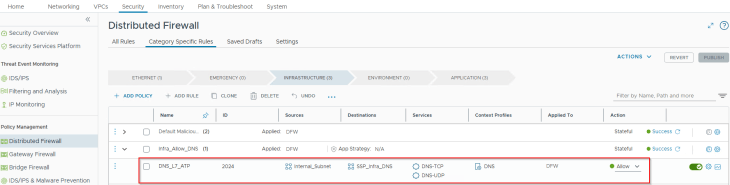
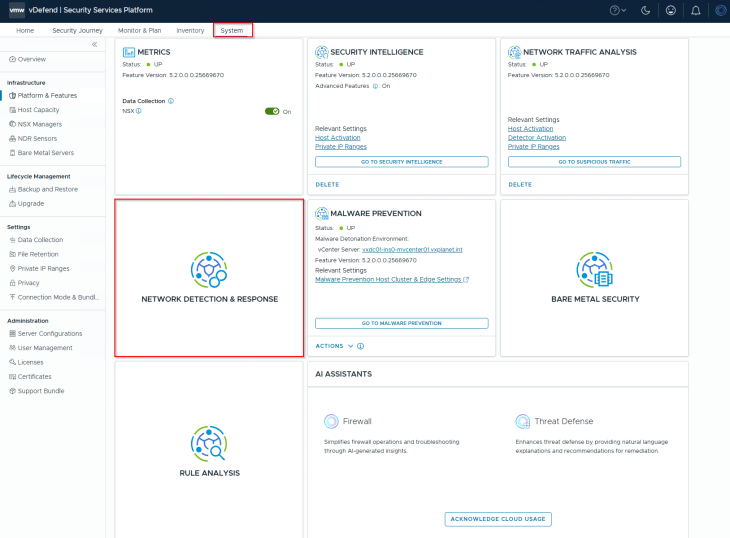
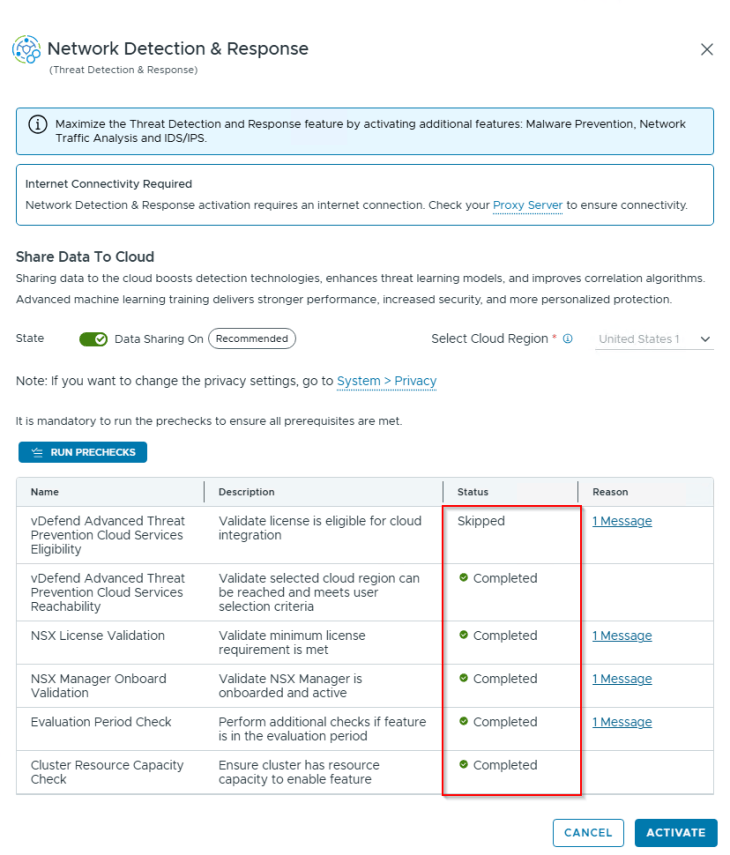
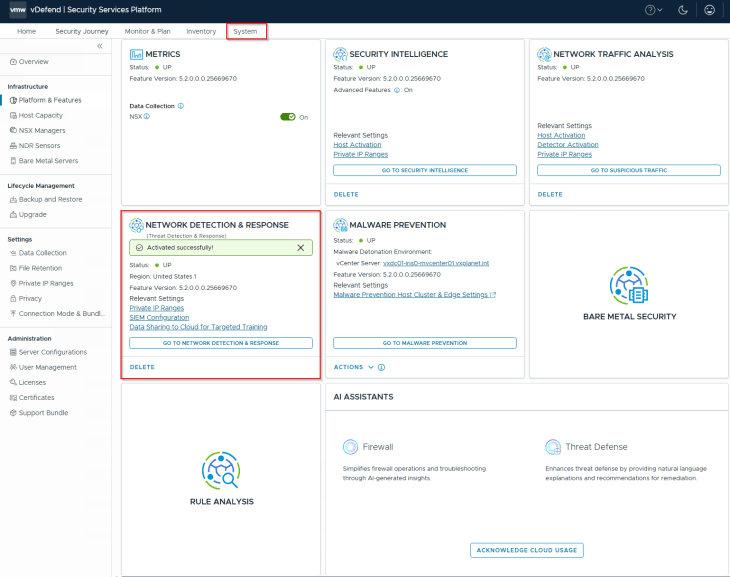
Activating Network Detection and Response
Next, we will activate the correlation engine called Network Detection and Response (NDR). NDR will be the central engine that receives telemetry information from IDPS, MPS and NTA to effectively correlate the lifecycle of an attack.
Threat Visualization and Analysis
Now that the ATP policies are in place, it’s time to trigger some exploits to test the efficacy of our configured rules and generate threat alerts & campaigns.
- Simulated Exfiltration and C2 traffic (IDPS): I did some prep works using AI to generate malware traffic mimicking data exfiltration and potential communication with an external Command and Control (C2) server, targeting the Database, Web and Search tiers of the application. This malware traffic stems from two families – LeftHook Stealer and Zyklon Trojan. There are no actual executables created for this malware, instead the L7 header was manipulated with the malware payload so the IDPS could detect and flag it.
- Malicious Executable (MPS): I downloaded the EICAR test executable and attempted to write to the local disks of the application VMs. EICAR is a harmless anti-malware test file (downloadable from https://www.eicar.org/) that we will use to test our MPS rules.
- Anomalies (NTA): The database and Search tiers of our application VxPlanet_Insite are deliberately built on non-standard port numbers for HTTPS and DB communication. This is to test NTA, and it should trigger the Uncommonly Used Port detector.
Because this is a very basic exploit test for our demonstration, and these threats are completely independent, we expect to see multiple threat campaigns generated during NDR correlation.
Let’s navigate to the respective consoles and review the generated threat alerts and campaigns:
IDPS Console
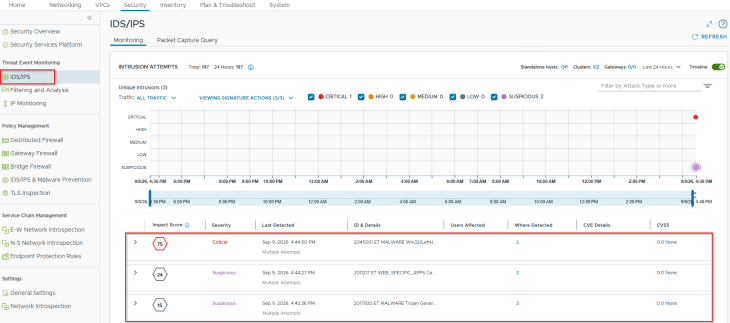
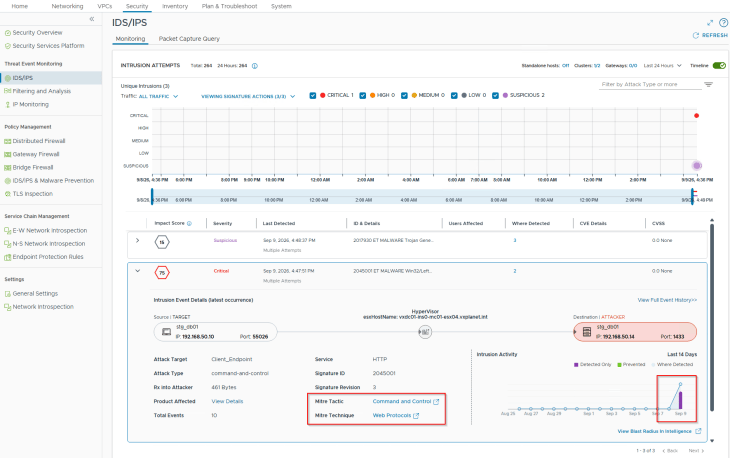
The IDPS engine successfully detected the malware activity for exfiltration and C2 communication, as the traffic payload matched its known signatures. Furthermore, the alert has been successfully classified within the MITRE ATT&CK framework, mapping to the Command and Control tactic and the Web Protocols technique, as below:
MPS Console
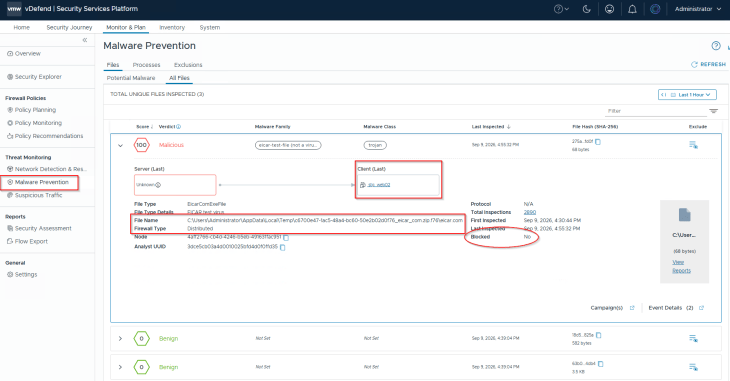
The EICAR executable was successfully detected during the initial attempt to write to the disk, but was not actively prevented as our MPS rule is currently running in Detect mode. This alert has been classified under the Execution tactic in the MITRE ATT&CK framework, as below:
NTA Console
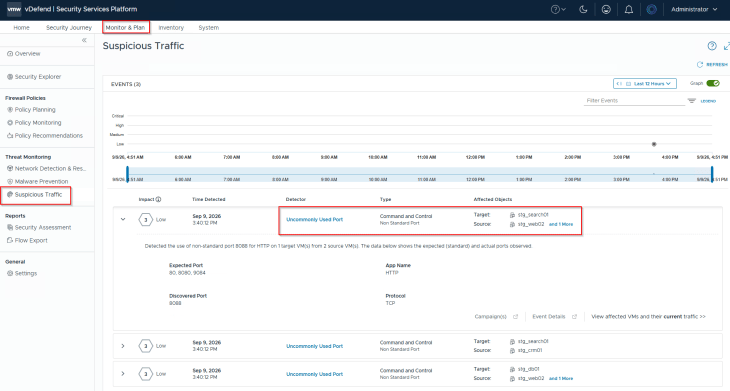
Because our database and search tiers are listening on non-standard port numbers for standard HTTPS and database communication, the Uncommonly Used Port detector successfully flagged the traffic as suspicious activity, exactly as expected.
NDR Console
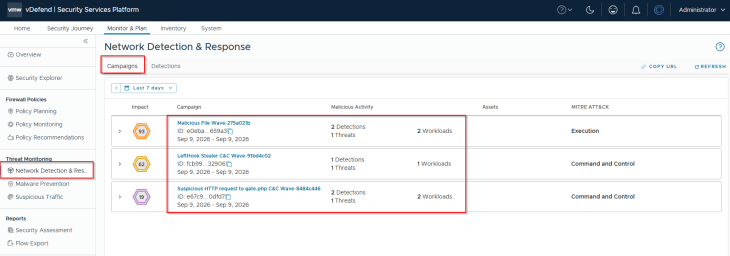
As expected, based on the telemetry correlation across all of these events, multiple threat campaigns have been generated in the NDR console.
Let’s summarize the campaigns:
- Malicious File Wave-275a021b: This campaign correlates to the EICAR executable detected by the MPS. The MITRE ATT&CK column in the above screenshot lists the associated MITRE tactics, which in this case is limited to Execution. This means that this threat has not progressed to subsequent attack stages (like Lateral Movement, Command & Control, Exfiltration etc).
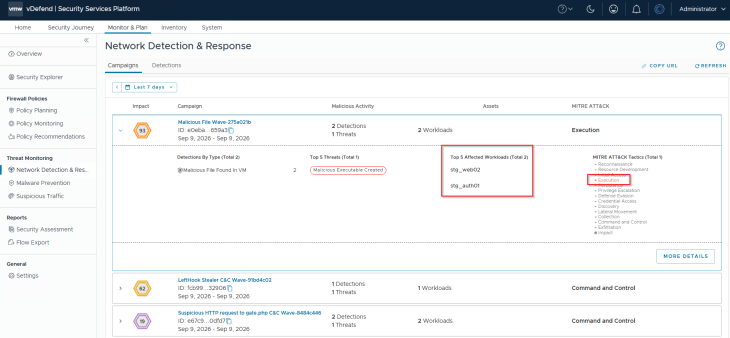
- LeftHook Stealer C&C Wave-91bd4c02: This campaign corresponds to the LeftHook Stealer malware traffic detected by the IDPS. The MITRE ATT&CK column in the above screenshot lists the associated MITRE tactics, which in this case is Command and Control.
- Suspicious HTTP request to gate.php-C&C Wave: This campaign relates to the Zyklon Trojan traffic caught by the IDPS. Once again, the MITRE ATT&CK column in the above screenshot lists the associated MITRE tactics, which in this case is Command and Control.
Further examining the campaign, we could see a blueprint of the entities involved and the communication chain mapping the entire attack lifecycle.
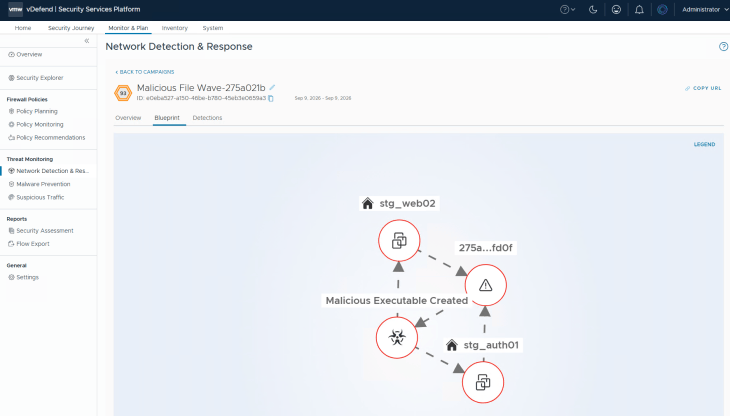
Additionally, the NDR console provides a comprehensive view displaying threat detections mapped directly to MITRE ATT&CK tactics over a specific timeframe, as below:
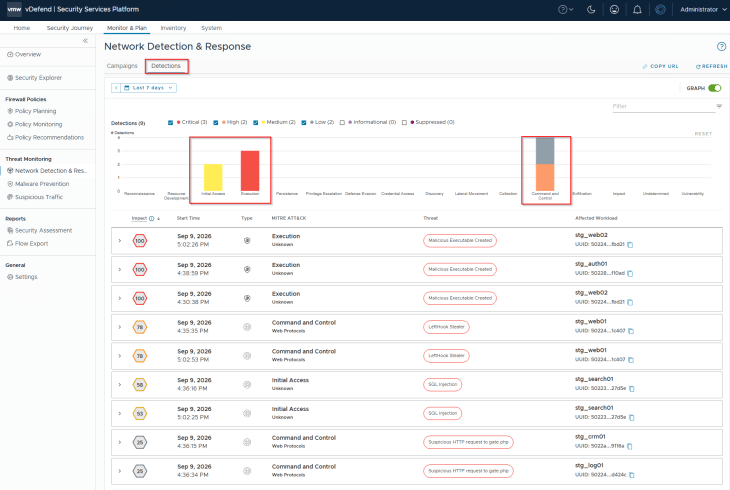
Configuring Threat Prevention
Now let’s implement lockdown rules for the application to actively block these threats.
Let’s navigate back to the IDPS and MPS policies we created earlier in Detect mode, and switch the action for both rules to Detect & Prevent.
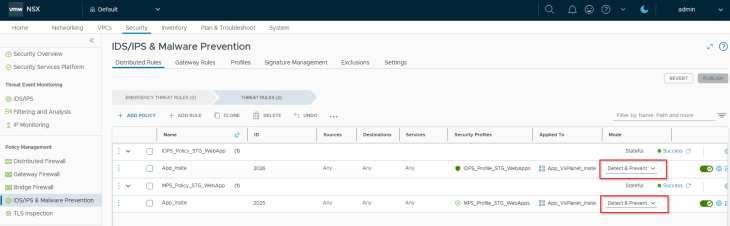
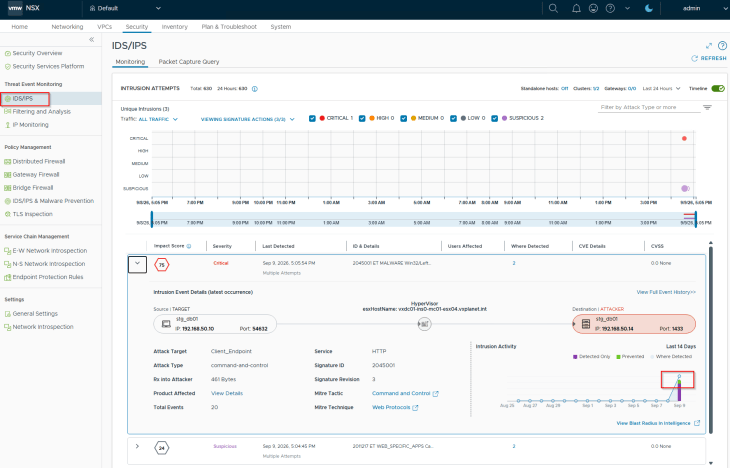
At this moment, we can see that the malware traffic is now actively blocked by the IDPS engine (as indicated by the Green color, highlighted)
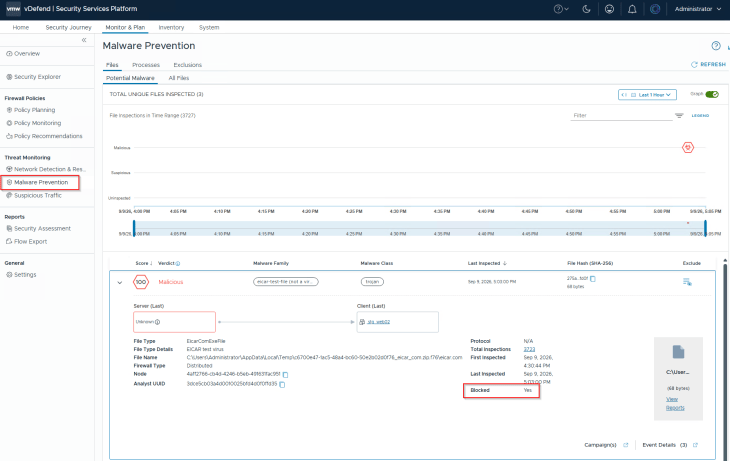
Similarly, the MPS engine has successfully blocked access to the EICAR executable, as shown below:
Triggering a Sandboxing activity
The threat investigation and prevention exercise we just completed did not invoke any malware sandboxing activity. This is because the EICAR executable is a well-known payload, and its file hash matched an existing signature known to MPS.
Let’s now trigger a sandboxing activity. For this we require files with unknown hashes, or files that fail to return a definitive verdict during local static analysis (by the SVMs).
After some extended search over the internet, I managed to locate some potential malicious files and attempted to copy them to the local disk of one of our application VMs.
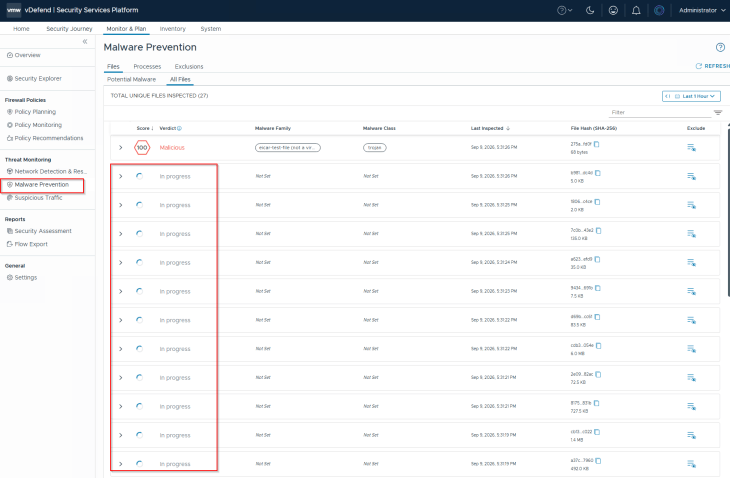
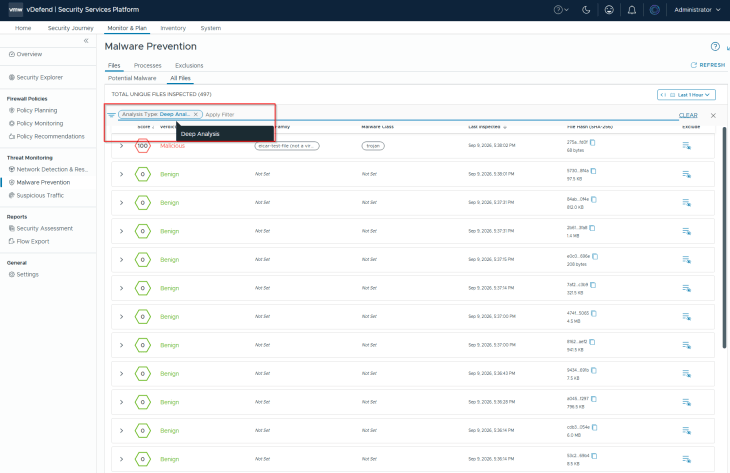
As you can see below, many of these files were automatically forwarded for Deep Analysis (sandboxing) because the initial static analysis could not determine a verdict (Malicious, Benign, or Unknown).
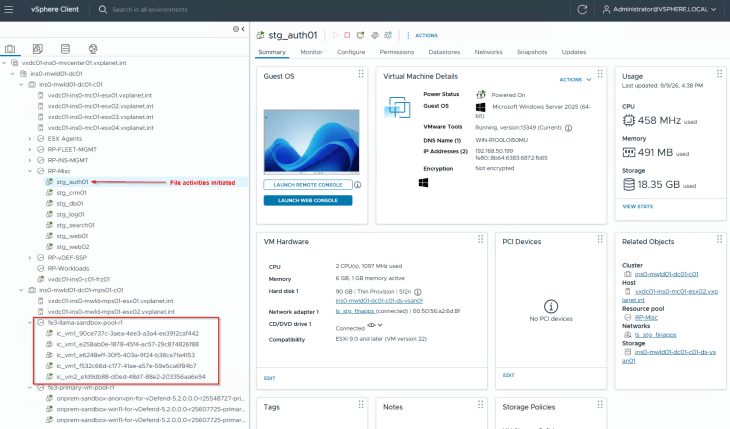
During this process, we see that instant clones of detonation VMs are provisioned. As stated previously, these VMs are spun up in the isolated network to safely execute the file and analyze its behavior. Once a verdict is determined and the status is sent back to the SSP, these instant clones are automatically deleted.
If the sandboxing environment determines a verdict, the final status is updated in the MPS console in SSP
Congratulations!!! If you are still reading this, we have reached the end of the three-part series on Distributed Malware Prevention and Sandboxing for VCF with VMware vDefend. We started by discussing the MPS architecture and deployment topologies for VCF in Part 1. In Part 2, we walked through the deployment process of MPS, including the on-premise sandboxing cluster. Finally, in this chapter, we configured ATP policies, simulated malware attacks to visualize, correlate, and actively block threats.
I hope this series was informative. Thanks for reading!!!
Continue reading? Here are the other chapters of this series:
Part 1: Distributed Malware Prevention and Sandboxing Architecture
https://vxplanet.com/2026/09/20/distributed-malware-prevention-sandboxing-for-vcf-with-vmware-vdefend-part-1-architecture/
Part 2: Distributed Malware Prevention and Sandboxing Deployment
https://vxplanet.com/2026/10/05/distributed-malware-prevention-sandboxing-for-vcf-with-vmware-vdefend-part-2-deployment/


