Welcome to Part 4 of the blog series on vDefend Security Services Platform and Security Segmentation. This chapter along with the subsequent six chapters will focus on application hierarchy imports to SSP and the DFW 1-2-3-4 approach for shared infrastructure services protection, environment / zone segmentation, application microsegmentation, NSX groups promotion, application scaling, application transitions, segmentation monitoring and more.
If you missed the previous chapters and wish to review the SSP deployment, NSX onboarding and feature activations, you can check them out from the links below:
Part 1: Introduction
https://vxplanet.com/2025/12/18/vdefend-security-services-platform-and-security-segmentation-part-1-introduction/
Part 2: Platform Deployment
https://vxplanet.com/2025/12/19/vdefend-security-services-platform-and-security-segmentation-part-2-platform-deployment/
Part 3: NSX Onboarding and Feature Activation
https://vxplanet.com/2025/12/19/vdefend-security-services-platform-and-security-segmentation-part-3-nsx-onboarding-and-feature-activation/
Let’s get started with a full hierarchy import of two applications belonging to two separate environments (CRM application in Dev and CRM application in Prod). A full hierarchy import means that the CMDB import process will utilize all the hierarchical scopes (currently five) that outlines the datacenter structure such as region, zone, environment, application and application tier.
Application Description and Hierarchy
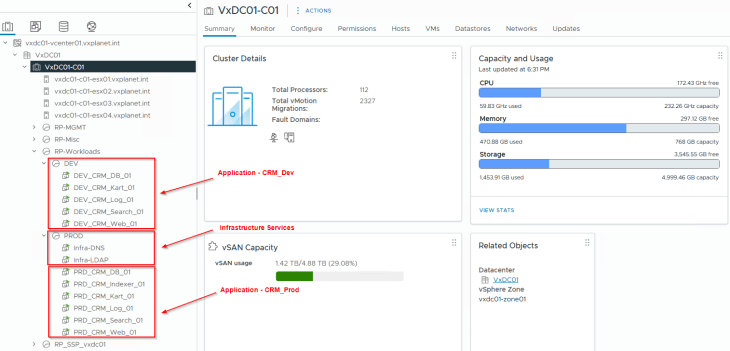
To demonstrate a full hierarchy import, I have deployed two applications and a few dependent infrastructure services in vCenter across two resource pools Prod and Dev.
- Application CRM_Prod hosted in the Prod environment
- Application CRM_Dev hosted in the Dev environment
- Shared Infrastructure services hosted in the Prod environment
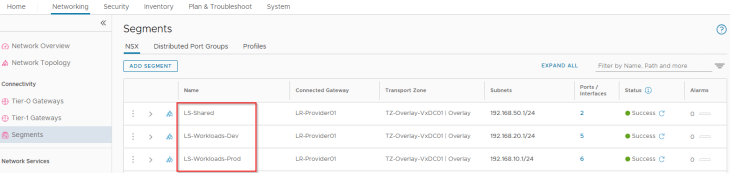
These two applications and the dependent Infrastructure services are hosted on separate NSX segments as per the network topology.
The below table shows the application details, including the tiers, VMs and the shared infrastructure services associated with the application.
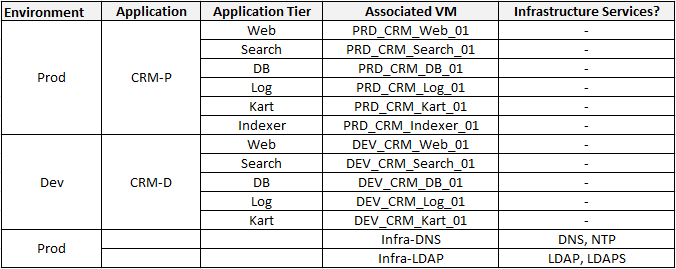
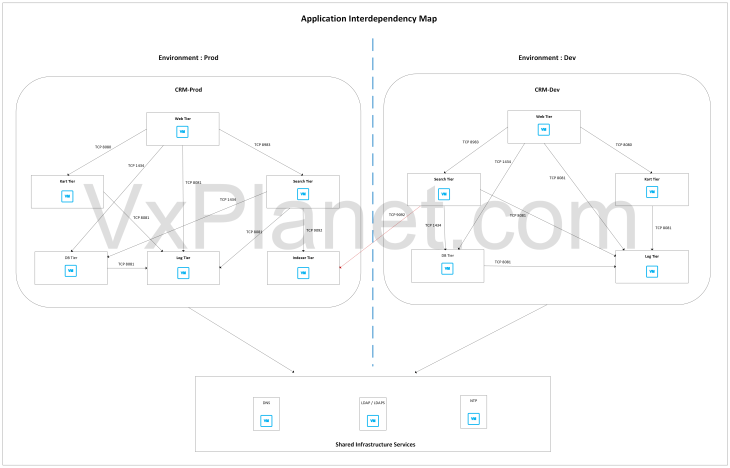
This is how the application interdependency map looks like. Note that there is an inter-environment communication between the CRM-Dev Search Tier and the CRM-Prod Indexer Tier.
As part of hierarchy import, it’s not required to provide the services, ports and protocol information to the workflow as it’s assumed that the flow information is not completely known and we will use Security Intelligence flow analysis to determine the necessary services involved, and review with the application blueprint to confirm that the recommendations match with the data we have.
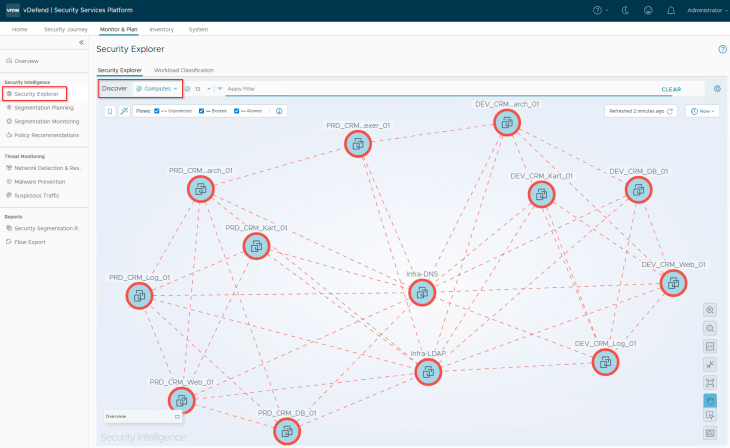
All the application VMs are synchronized from NSX to SSP and are available as inventory assets.

At this moment, we see all the flows as unprotected in Security Intelligence (as expected).
Calculating the Segmentation Score
The first step before the segmentation activity is to generate the segmentation score and report. The segmentation score is based on the current security posture based on DFW configuration (like the necessary infrastructure, environment, application rules) and the volume of unprotected flows in Security Intelligence.
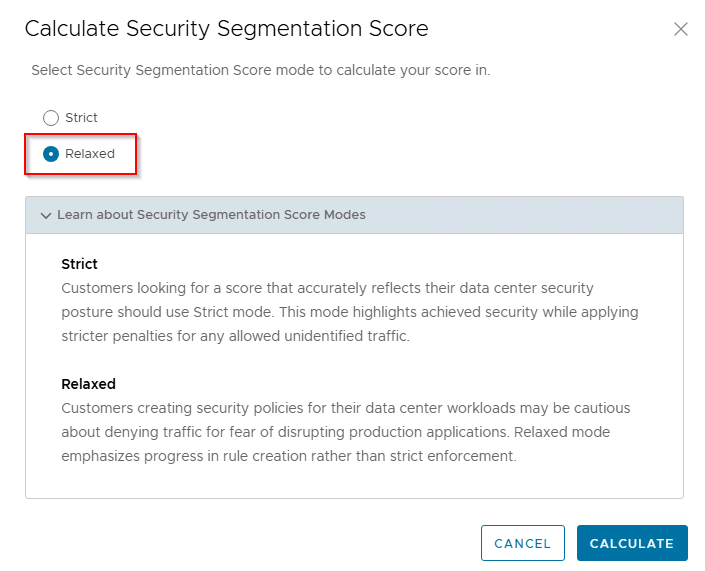
Navigate to Monitor & Plan -> Security Posture and click on Calculate Score

We will choose Relaxed mode as it applies lesser penalties to score calculations, and since we are currently in the process of segmentation journey, this mode only emphasize in rule creation progress rather than assessing lockdown rules which we don’t have currently.
Unfortunately, being a lab environment with small scale of applications, we don’t have the minimum required volume of unique flows (1000) needed to generate a segmentation score. We will check back in later, but this was just FYI.
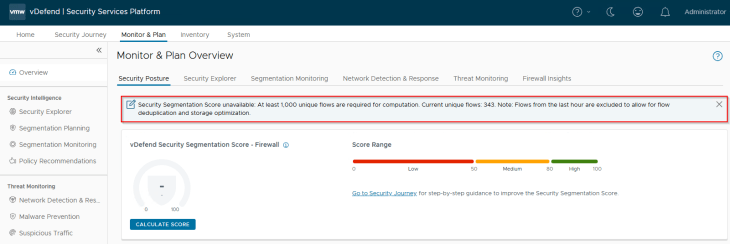
Since we are at the beginning of the segmentation journey, it’s expected to have a low score value. We will need to re-run the score as we make progress in the segmentation journey.
Explaining the Metadata csv
Now let’s download the template csv file that we can use to provide the cmdb metadata information to SSP. In real environments, this csv file can be directly downloaded from CMDB applications like ServiceNow, Sharepoint sites etc with the csv columns appropriately edited to match with the expected import workflow.

The below is the csv metadata file duly filled in with the details of applications and shared infrastructure services that we deployed.

Now let’s discuss in more details about the column headers.
- Asset Type: This field describes the type of asset that we are importing. The supported options are VIRTUAL_MACHINE, GROUP, SEGMENT, DVPG, TIER_1, TIER_0 and IP_ADDRESS. In our case, we use the asset type as VIRTUAL_MACHINE
- Asset Identifier: This field is used to uniquely identify the asset based on name, uuid or IP address. Up to a maximum of three asset identifiers are supported, with each one mapped as a column header. Atleast one asset identifier is required to map the asset. If there are multiple asset identifiers provided, asset lookup happens from the leftmost column to the right, and stops at the first match. In our case, we use the asset identifier as asset_name.
- Application hierarchy: Up to five columns that outlines the application hierarchy is supported. The columns map as region, zone, environment, application and application tier. Partial hierarchies are also supported, for example if we provide only three columns that maps environment, application and application tier, the region and zone fields are skipped in the hierarchy. If we are only importing shared infrastructure services, all the five columns can be skipped. In our case, we will use all the five columns to support full hierarchy import.
- Infrastructure Services: This field identifies the shared infrastructure services. Currently the below 14 standard infrastructure services are supported. If an asset is responsible for multiple infrastructure services, the column can have multiple values. Infrastructure services are categorized into their own groups and are not part of the hierarchy.
- DNS-UDP
- LDAP
- LDAP-UDP
- LDAPS
- NTP
- SYSLOG
- SYSLOG-UDP
- SNMP-SEND
- SNMP
- DHCP
- DHCP-Client
- DHCPv6
- DHCPv6-Client
In our case, we have only four infrastructure services – DNS, NTP, LDAP and LDAPS
Depending on the segmentation use cases, it is important to include the right hierarchy in the csv import process. For example:
- If the use case is around application microsegmentation, it’s mandatory to have both application and application tier columns included
- If the use case is around application ring fencing, it’s mandatory to have application column, application tier column is not required
- If the use case is around environment segmentation, it’s mandatory to have environment column and recommended to have the application column. This is because inter-environment exceptions rules are created based on application groups
- If the use case is to microsegment applications spanning across two or more zones, we could skip the region and zone columns and include environment, application and application tier columns
Now if we translate the csv metadata to an application hierarchy diagram, it looks like the below:
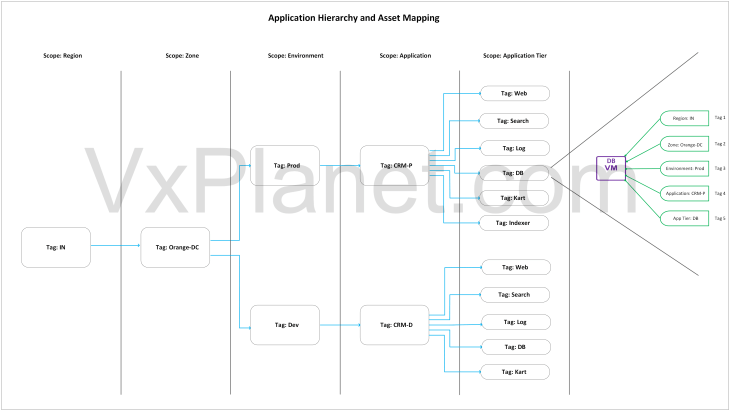
VMs are assigned tags based on the hierarchy, where each hierarchy column header maps to a scope and the respective column value maps to a tag. SSP inventory assets and NSX security groups are created based on dynamic tag-based criteria that maps to regions, zones, environments, applications and application tiers.
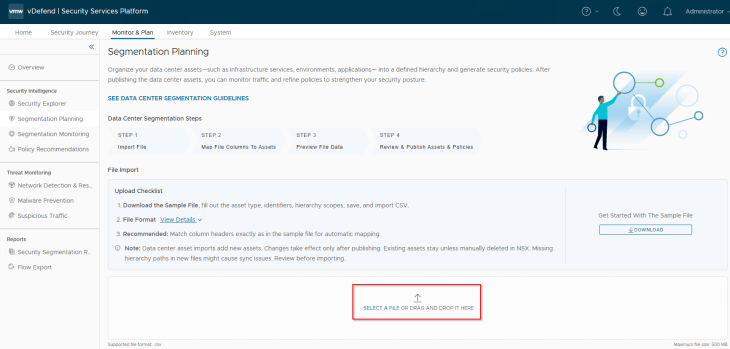
Importing the Hierarchy
Now let’s import the csv metadata file to Security Intelligence.
We will map the column headers in the imported csv to the respective fields. If we used the csv template downloaded from SSP and the default column headers are not modified, then the mappings will be done automatically.
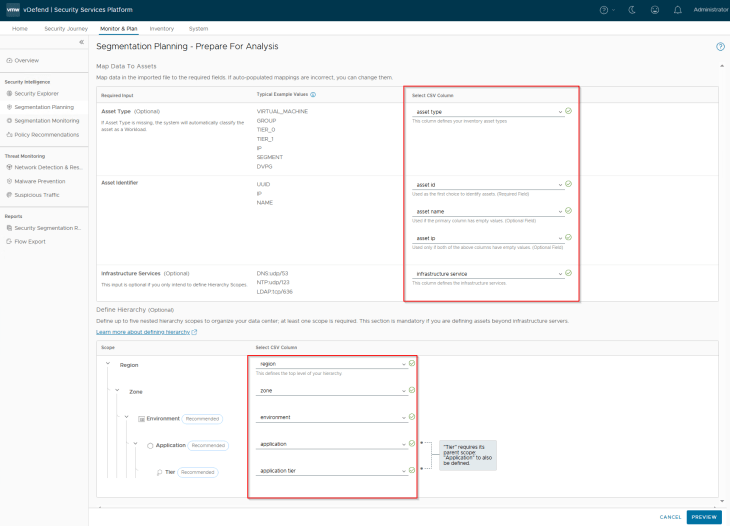
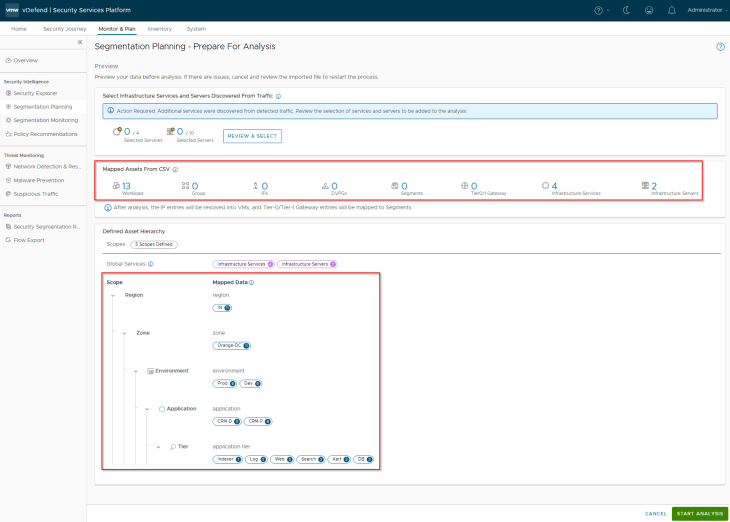
This is a preview of the assets and hierarchy that are mapped from the csv. Notice the five scopes and the different tags that will be applied to the VMs included in the csv.
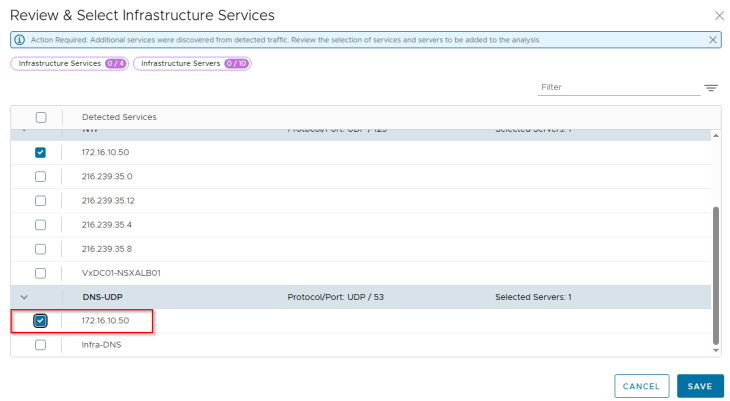
We have included two shared infrastructure servers and four services in the csv metadata. However, it’s possible that based on flow analysis, additional infrastructure services and servers exist and optionally we could include those in asset mapping and rule recommendations. Let’s do that now.

Under NTP, we see a lot of entries and most of them are public endpoints which can be excluded (unless it’s required). We will include some internal NTP servers from this list.
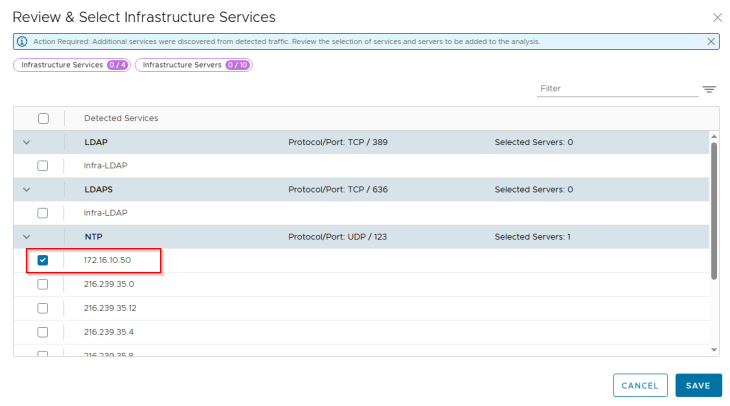
The same goes for DNS as well, we will include the internal DNS servers presented in the list
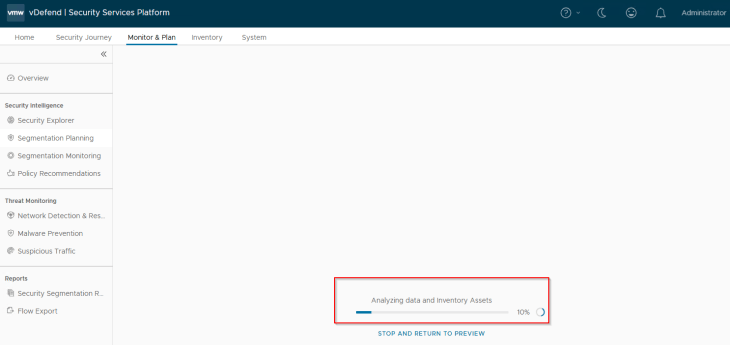
Once the selections are confirmed, we can run the analysis, this might take some time depending on how large the import metadata is.
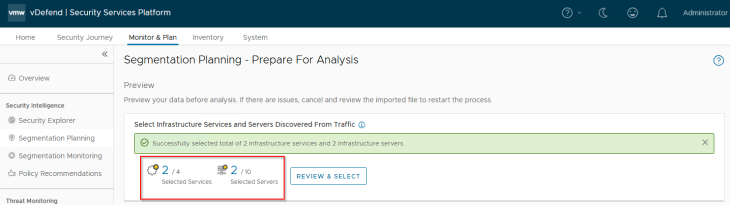
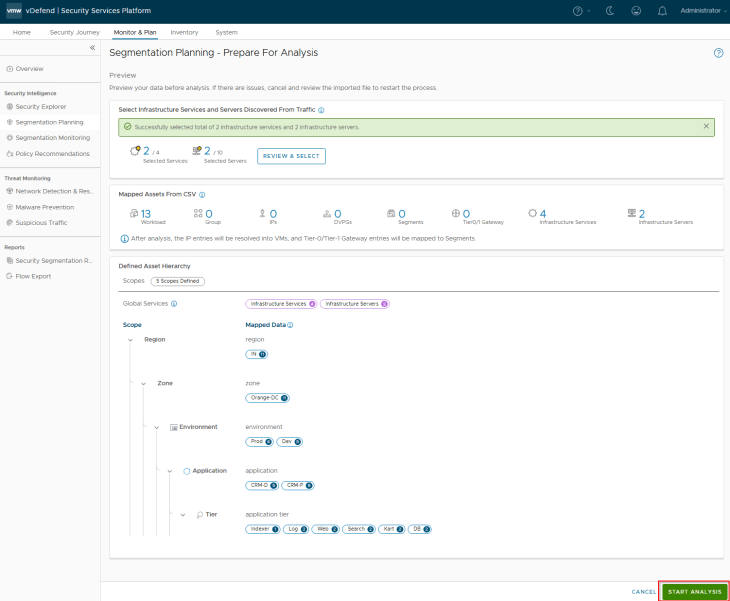
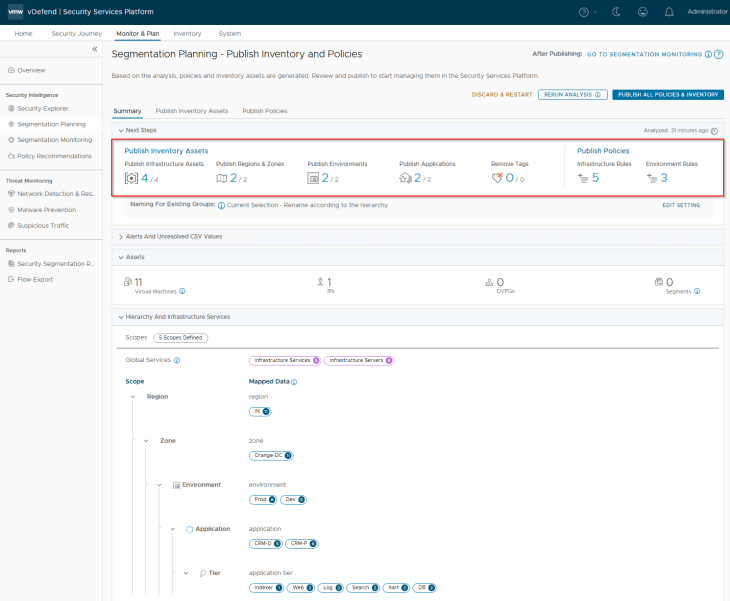
Okay, the analysis is now complete. Based on the hierarchy, we have the below assets and rules recommended for publishing:
- 4 Infrastructure assets (basically the 4 infrastructure services – DNS, NTP, LDAP and LDAPS)
- 1 Region (IN)
- 1 Zone (Orange-DC)
- 2 Environments (Prod and Dev)
- 2 Applications (CRM-P and CRM-D)
- All the application tiers for each environment
- 5 Infrastructure rules (for the Infrastructure category in DFW)
- 3 Environment rules (for the Environment category in DFW)
Reviewing Inventory Assets and Policies
Let’s review the assets and recommended policies / rules:
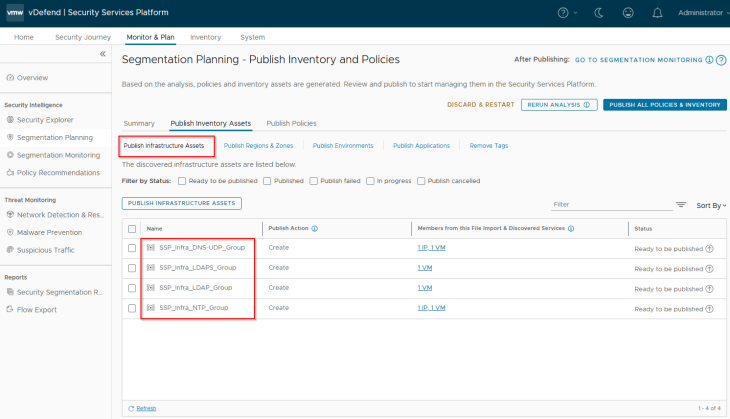
Below are the Infrastructure assets that are available for publishing. They will be mapped as static security groups in NSX manager. Each asset represents an infrastructure service like NTP, DNS, LDAP etc
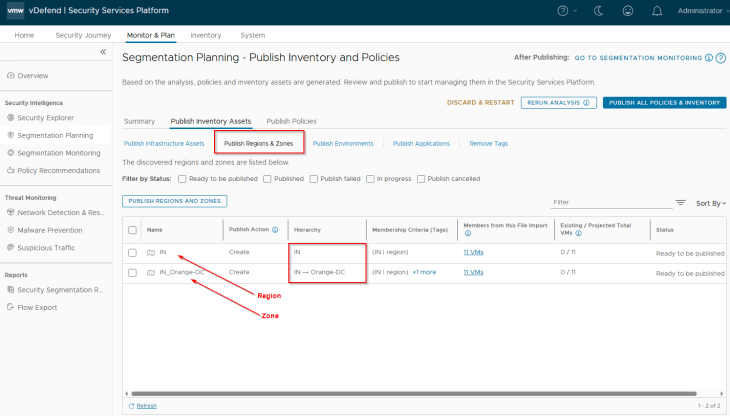
Below are the Region and Zone assets recommended for publishing. They will be mapped as dynamic tag-based security groups in NSX manager.
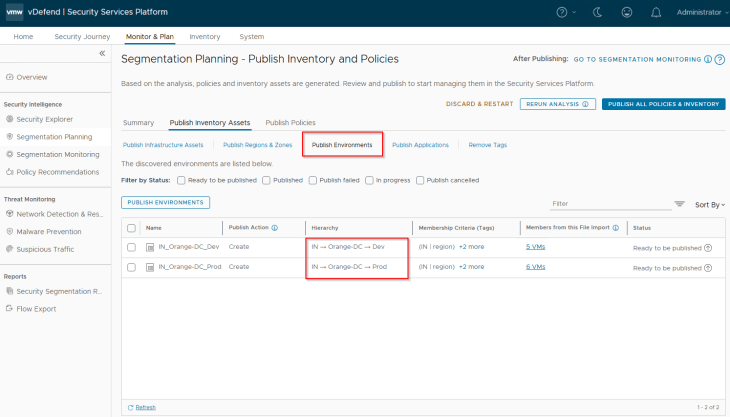
Below are the Environment assets recommended for publishing. They will be mapped as dynamic tag-based security groups in NSX manager.
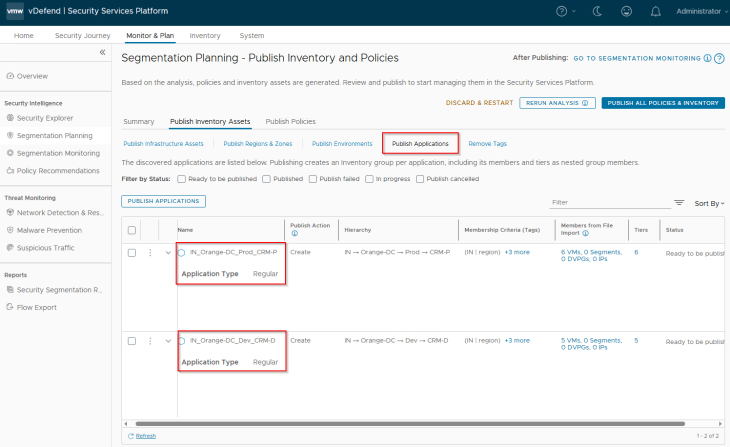
Below are the Application assets recommended for publishing. They will be mapped as dynamic tag-based security groups in NSX manager. Application assets can be of type Regular or Critical depending on how the flow prioritization need to be done, we will discuss this later.
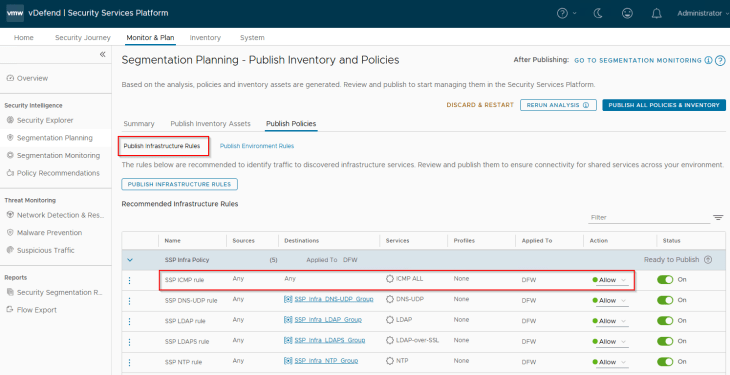
Below are the Infrastructure rules that are recommended for publishing. Notice the default ICMP rule at the top of the ruleset. If the enterprise does not permit ICMP, change the action to Deny / Drop. Lockdown policies will be implemented later as part of segmentation monitoring in Part 6.
Below are the Environment rules that are recommended for publishing. The rules are for Intra-environment access with an action of ‘Jump to Application’ to facilitate microsegmentation rules under the Application category. Inter-environment exceptions and lockdown rules will be implemented later as part of segmentation monitoring in Part 6.

Let’s take a break now, and resume in Part 5 where we will publish the assets & policies and review the objects that are created in NSX. Stay tuned!!!
I hope the article was informative. Thanks for reading.

Continue Reading? Here are the other parts of this series:
Part 1: Introduction
https://vxplanet.com/2025/12/18/vdefend-security-services-platform-and-security-segmentation-part-1-introduction/
Part 2: Platform Deployment
https://vxplanet.com/2025/12/19/vdefend-security-services-platform-and-security-segmentation-part-2-platform-deployment/
Part 3: NSX Onboarding and Feature Activation
https://vxplanet.com/2025/12/19/vdefend-security-services-platform-and-security-segmentation-part-3-nsx-onboarding-and-feature-activation/
Part 5: Publishing Assets and Policies
https://vxplanet.com/2025/12/22/vdefend-security-services-platform-and-security-segmentation-part-5-publishing-assets-and-policies/
Part 6: Segmentation Monitoring and Policy Recommendations
https://vxplanet.com/2025/12/23/vdefend-security-services-platform-and-security-segmentation-part-6-segmentation-monitoring-and-policy-recommendations/