
Welcome back!!! We are at Part 6 of the blog series on vDefend Security Services Platform and Security Segmentation. In the previous two chapters (Part 4 and Part 5), we onboarded two instances of the CRM application (CRM-Prod and CRM-Dev) as a full hierarchy import to SSP, published the inventory assets and foundational infrastructure and intra-environmental policies and left the platform for flow monitoring. In this chapter, we will complete the segmentation journey of the onboarded applications by configuring the necessary flow-based exception and microsegmentation rules with the final step of locking down the shared infrastructure services, environment and application policies.
This is all performed from a new section in Security Intelligence called Segmentation Monitoring, with a guided workflow starting from Infrastructure Services Protection to Environments to Applications. At the end of each phase, we will run the segmentation score to view improvements in the security posture as we progress.
Let’s get started:
Monitoring and Lockdown of Shared Infrastructure Services
Navigate to Monitor & Plan -> Segmentation Monitoring -> Infrastructure Services. This section displays the standard infrastructure rules that we published in the previous chapter.
The first item to review here is the field named ‘New Detected Servers’ under each infrastructure rule (called traffic rule). These are the newly discovered servers from flow monitoring that handles the same service. These entries can be reviewed, and if needed can be added to the respective infrastructure asset. If there are discovered servers for a different infrastructure service that is not already present, the workflow suggests to create new infrastructure assets and the associated infrastructure rules for the service.
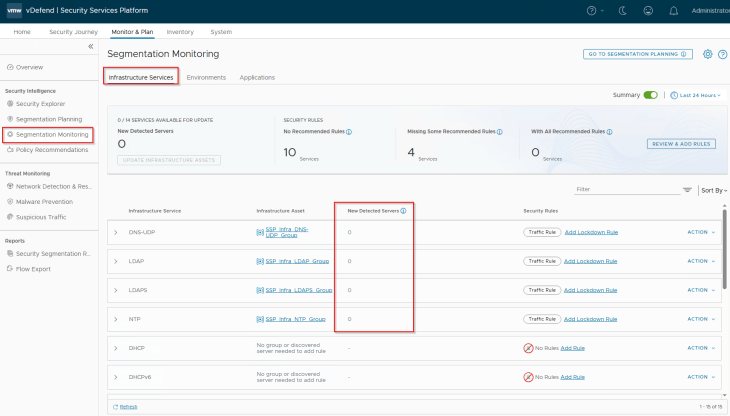
The second item to review is the unprotected flows, if any. Usually, we don’t expect any unprotected flows in these rules, as the source is set to ANY with an applied-to field set to DFW, unless we have modified the rules from NSX Manager.
If there are no new detected servers and unprotected flows against the infrastructure rules, we can implement lockdown rules to secure the shared infrastructure communications. In a typical production environment, this could take weeks to complete, considering the scale, reviews and approvals.
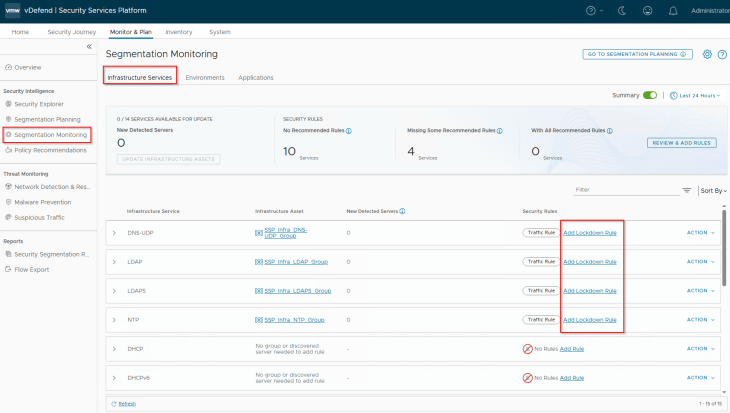
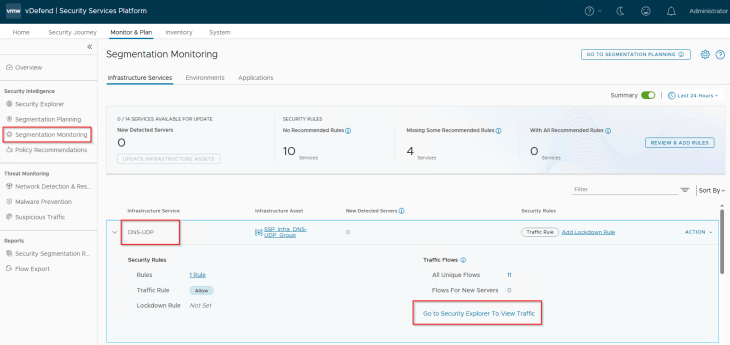
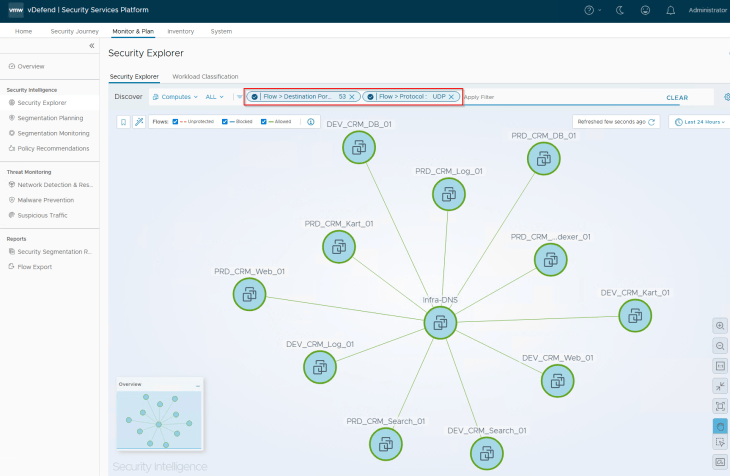
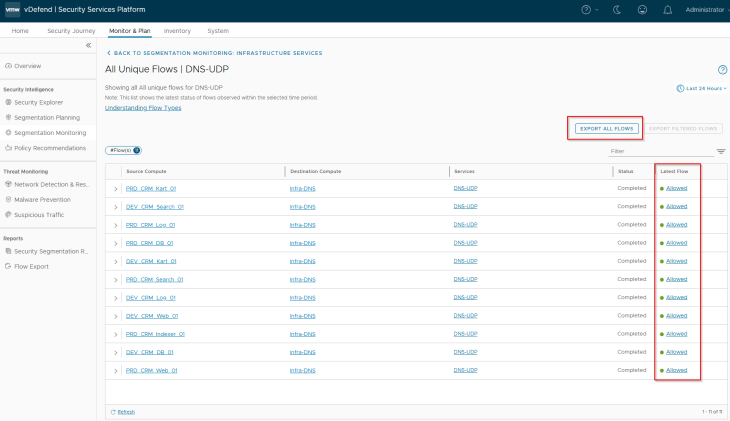
Let’s walk through the process of locking down one infrastructure service, the same procedure applies to the other services also.
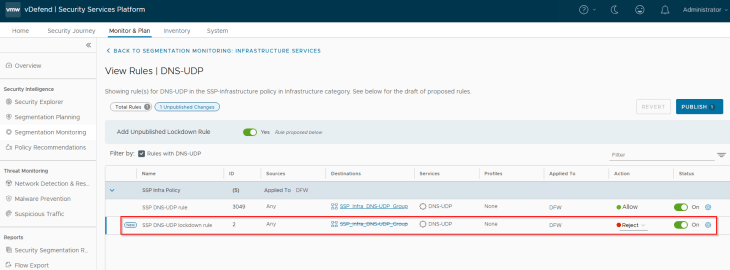
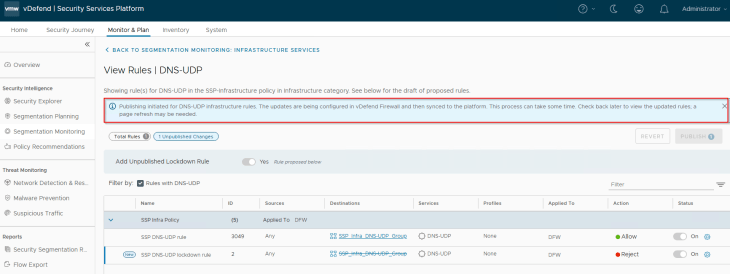

This is the target state of shared infrastructure services section. We have lockdown rules implemented for all the infrastructure services, and the same is pushed to NSX manager. Each Infrastructure service now has a pair of rules – a traffic rule to allow communication (whitelist) and a lockdown rule to reject / drop (blacklist)

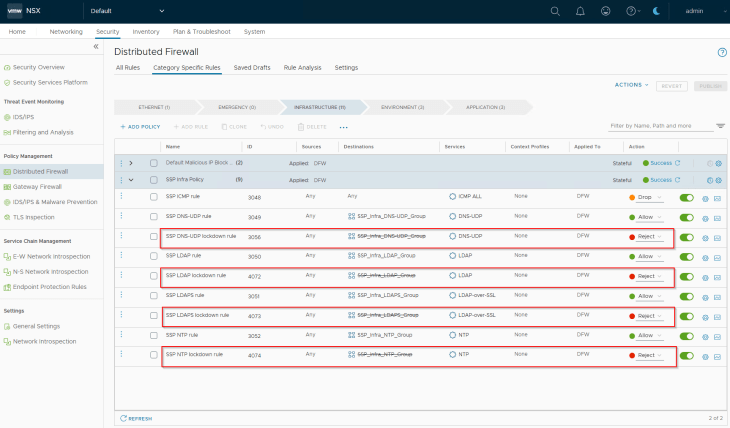
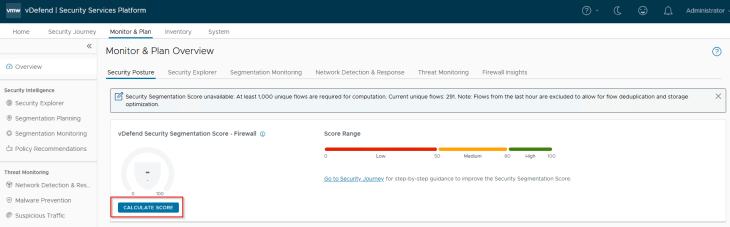
Success!!! We completed one milestone of the segmentation journey. Optionally we could run the segmentation score and see the improvement in security posture.
Adding Inter-Environmental Exceptions and Environment Lockdown
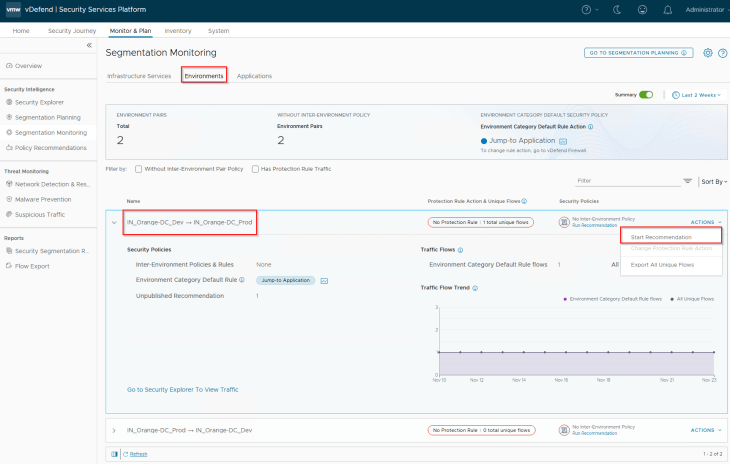
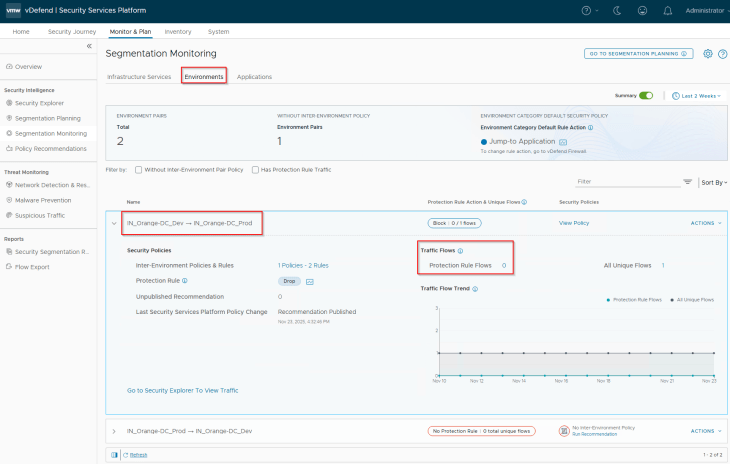
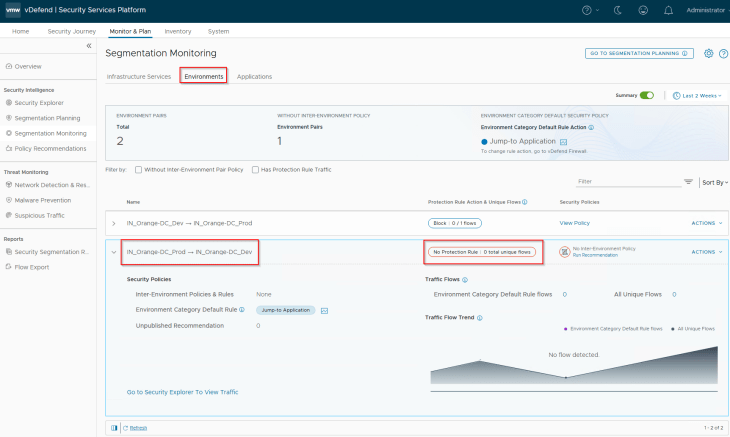
Navigate to Monitor & Plan -> Segmentation Monitoring -> Environments. We will see the two environments Prod and Dev that was published in Part 5 along with the suggested inter-environment policy pairs. The inter-environment pairs are created based on the direction of traffic. For example, for the Prod and Dev environments, Security Intelligence creates two distinct traffic pairs – Prod to Dev and Dev to Prod
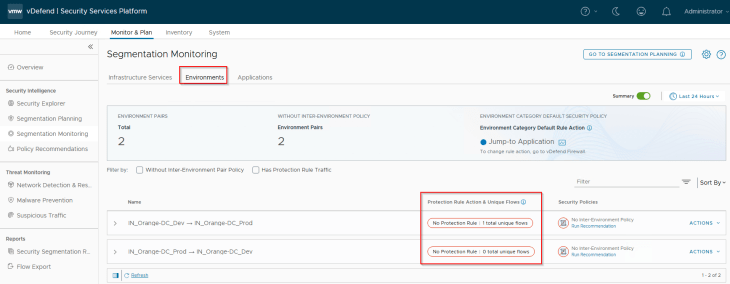
The first item to review here is the inter-environment flows. Hope you remember the application interdependency map that we discussed in Part 4, where we had an inter-environment communication between CRM-Dev Search Tier and the CRM-Prod Indexer Tier.
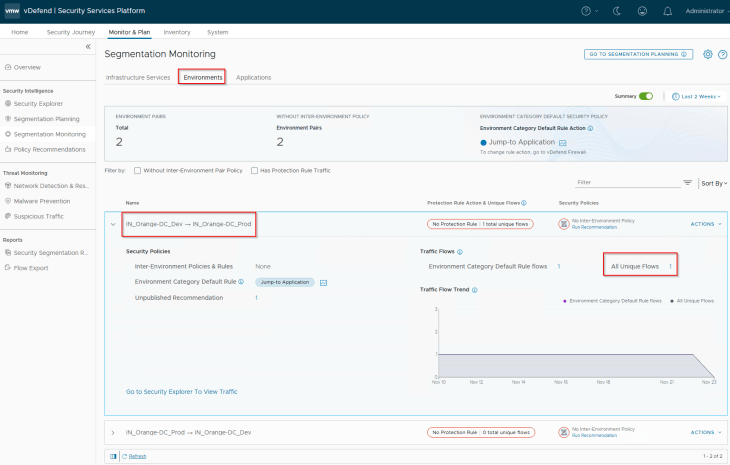
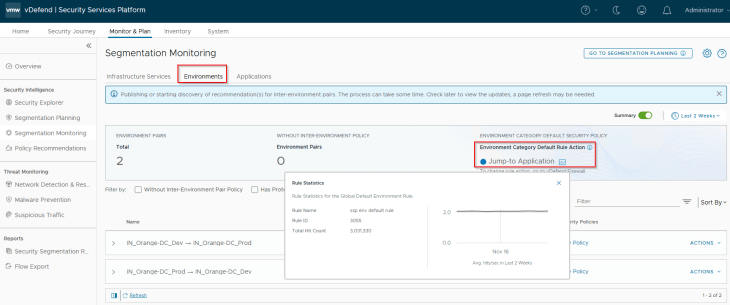
The second item to review is the action of Environment Category Default Rule. The default action is ‘Jump to Application’. We need to make sure that flows hitting this default rule is categorized as Unprotected, to be able to generate recommendations for the Environment category. Since we have the default Application category rule (ANY -> ANY), set to ‘Allow’ currently, any flows hitting the default environment rule will be then handled by the default Application category rule and thus marked as Unprotected.
The third item to review is the action of the protection rule. Protection rule is created per inter-Environmental policy pair that is used to lockdown the inter-environment communication and is placed after the necessary inter-environment exception rules. In a typical production environment, we start with an action of ‘Jump to Application’, monitor the protection rule periodically, add incremental rules, and eventually change to action to Drop / Reject if there is nothing else to exempt. This could take weeks depending on the scale, necessary reviews and approvals.
And the fourth item to review and consider is about the inter-environment exceptions. Inter-environment exceptions are always created based on application groups. For this reason, even if the use case is around environment segmentation, it’s good to include the application metadata information in the import csv file.
Now let’s run a recommendation for the Inter-Environmental policy, Dev -> Prod
Since our’s is a small lab environment and we already know there isn’t any other communication between Dev -> Prod except the one we stated earlier, we can use the protection rule action as ‘Drop’
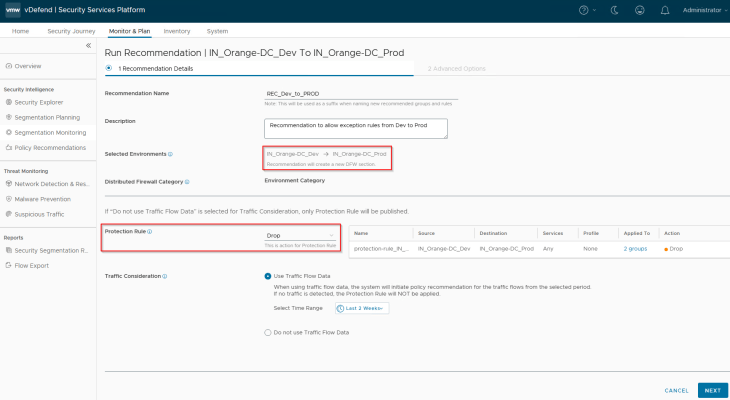
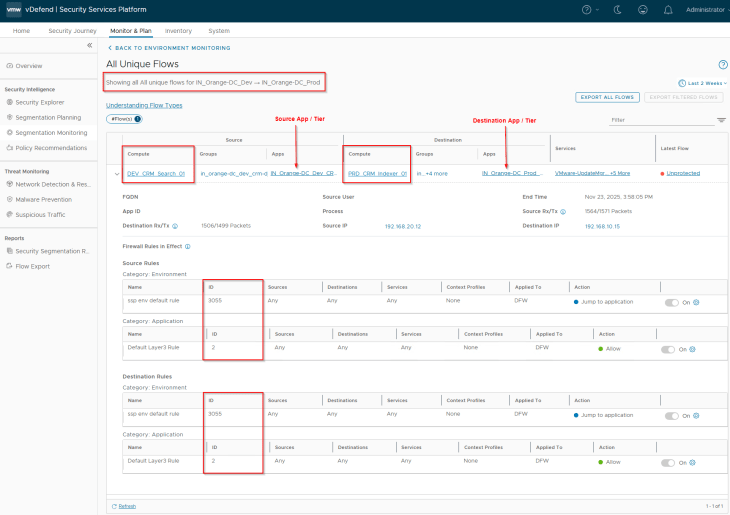
Notice the inter-environment exception rule and the protection rule that is suggested. As stated earlier, exception rules are created based on application groups only.
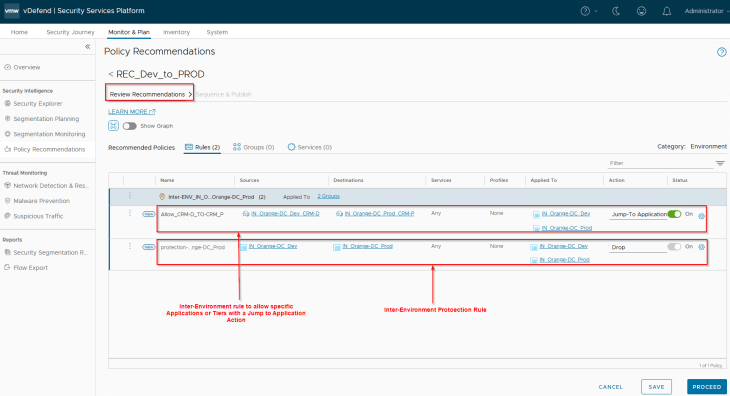
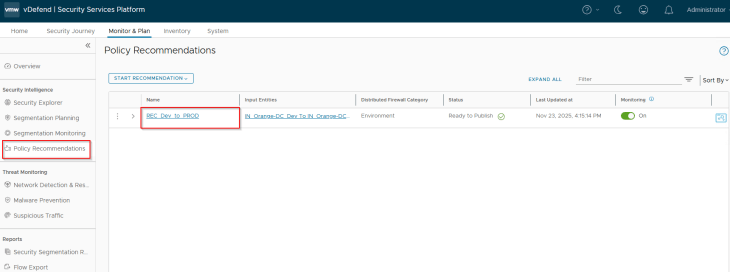
And the inter-environment policy is published to NSX manager.
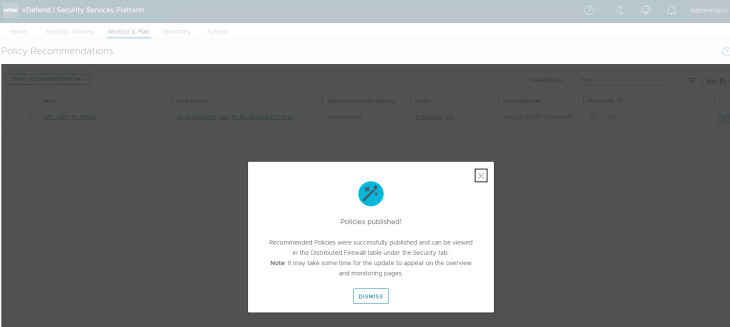
The protection rule in the published inter-environment policy needs to be reviewed periodically, and necessary exception rules need to be created over the time.
In scenarios where we started with a protection rule action of ‘Jump to Application’ and later change to Drop or vice-versa, changing the protection rule action is supported.
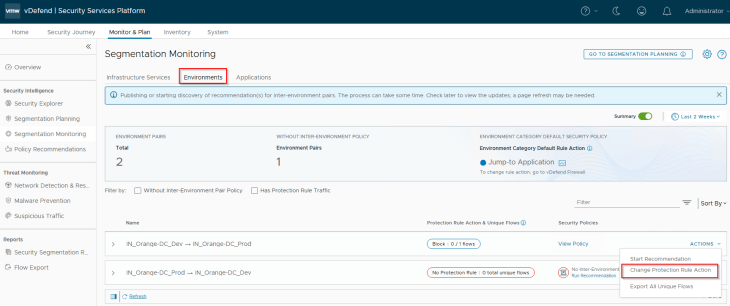
Now let’s repeat the same steps to run a recommendation for the Inter-Environmental policy, Prod -> Dev
Since we don’t have flows between Prod to Dev, there won’t be any exception rules recommended, just one protection rule with an action of Drop.
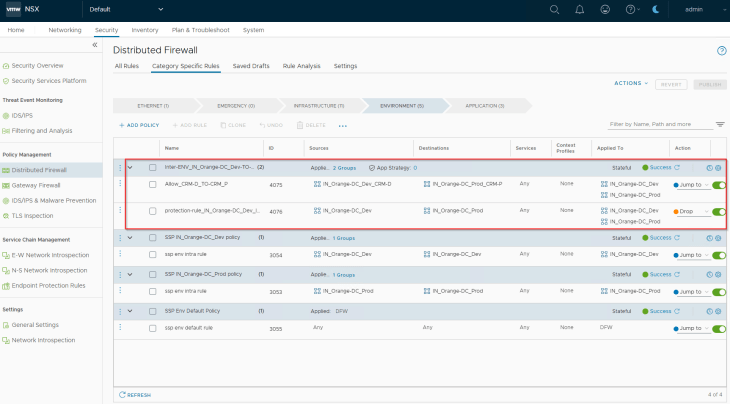
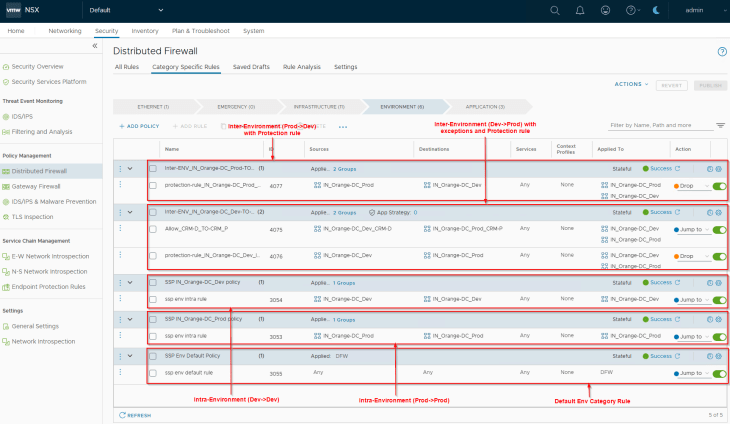
Once all the inter-environment policies are published, we have the below policies available in NSX manager in the Environment category:
- Intra-Environment (Prod -> Prod)
- Intra-Environment (Dev -> Dev)
- Inter-Environment (Prod -> Dev with lockdown rule)
- Inter-Environment (Dev -> Prod with exceptions and lockdown rules)
Success!!! We achieved our next milestone in the segmentation journey, optionally we could run the segmentation score to see improvements in the security posture.
Monitoring and Lockdown of Applications
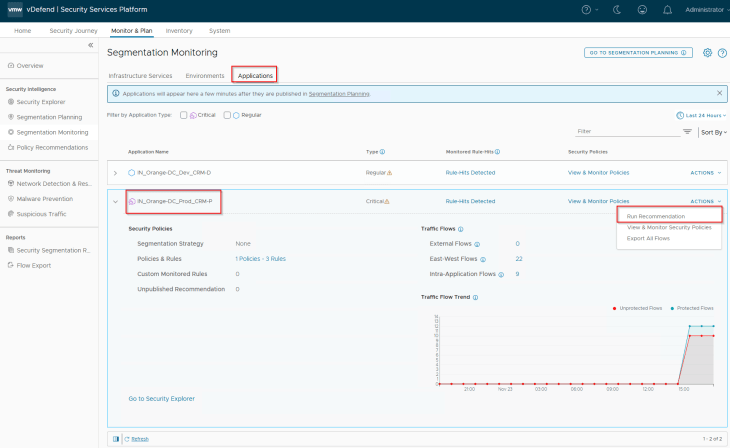
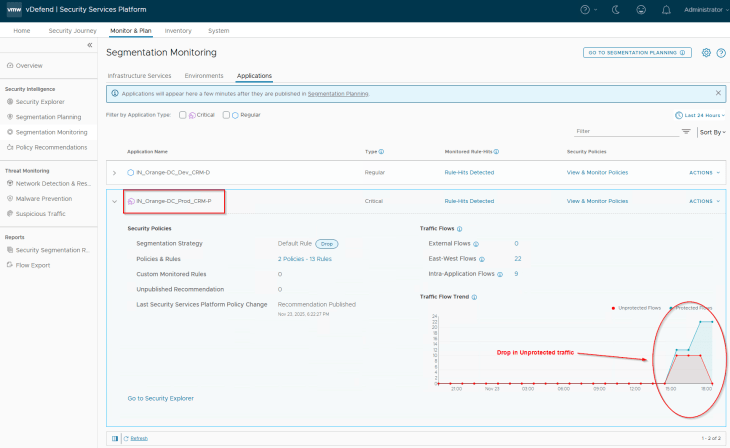
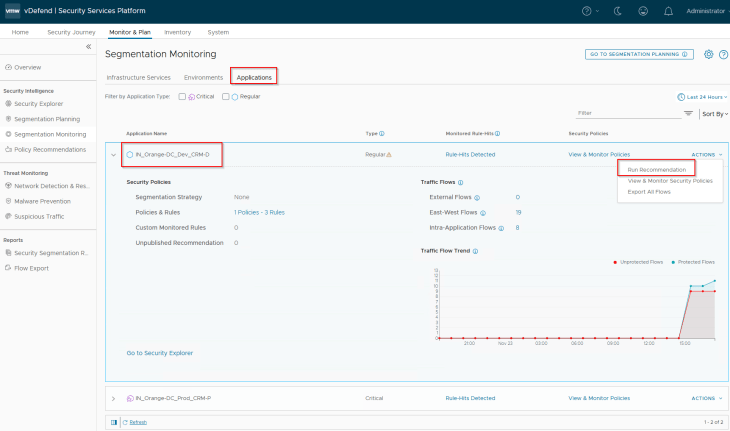
Navigate to Monitor & Plan -> Segmentation Monitoring -> Applications. We will see the two applications (CRM-P and CRM-D) that we onboarded to SSP.
The first item to review here is the East-West, Intra-Application & External flows and identify the unprotected and blocked flows (if any). Let’s review the flows for CRM-P application.
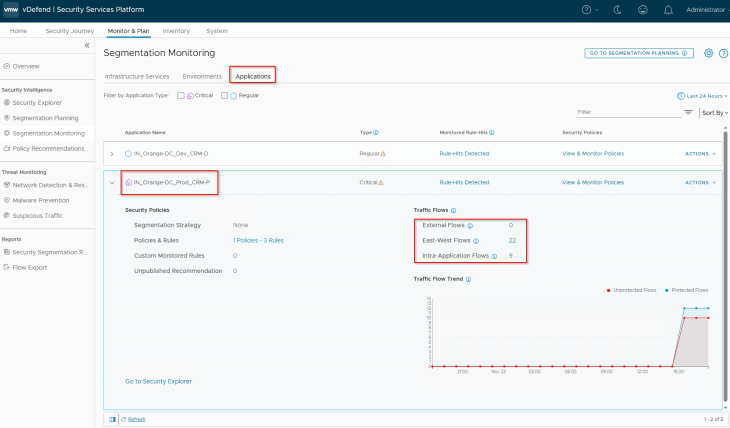
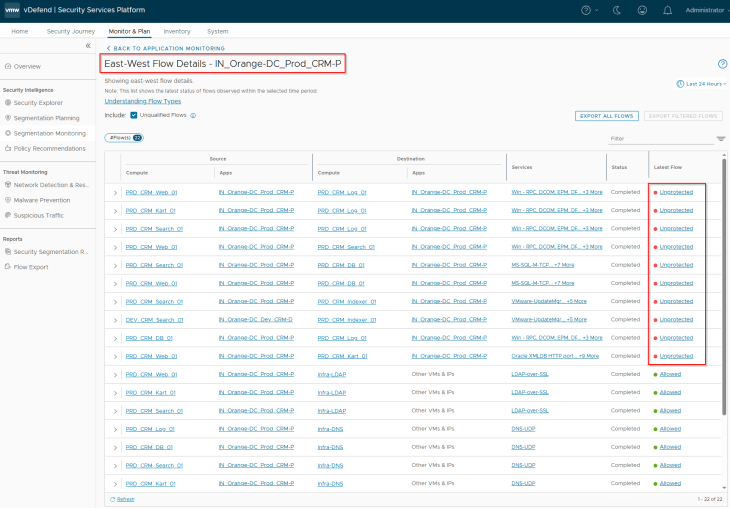
We only see Unprotected flows and no blocked flows. If we see any blocked flows, we must review and confirm if those flows are legitimate and need to be included in the recommendation process.
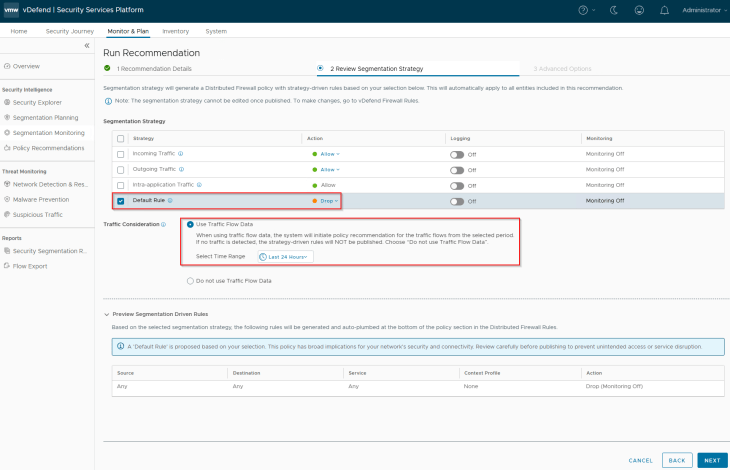
The second item to review and consider is the application segmentation strategy. The strategy can be either application ring fencing or application microsegmentation. In both cases, we could also include a default rule scoped at the application with an action of Allow / Deny. In a typical production environment, we start with an action of Allow to prevent any legitimate flows from getting blocked, monitor this rule and add incremental rules over the time, and eventually change the action to Deny which, at this stage is called Application lockdown.
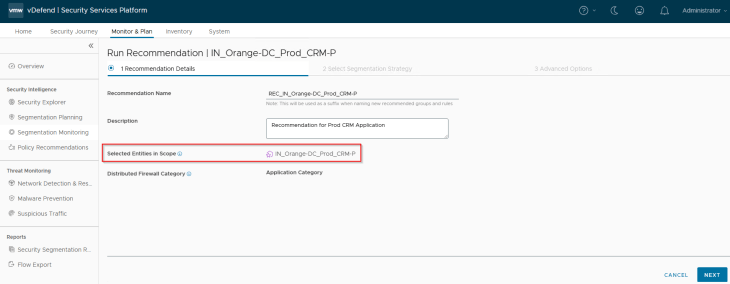
Let’s run a recommendation for the CRM-P application
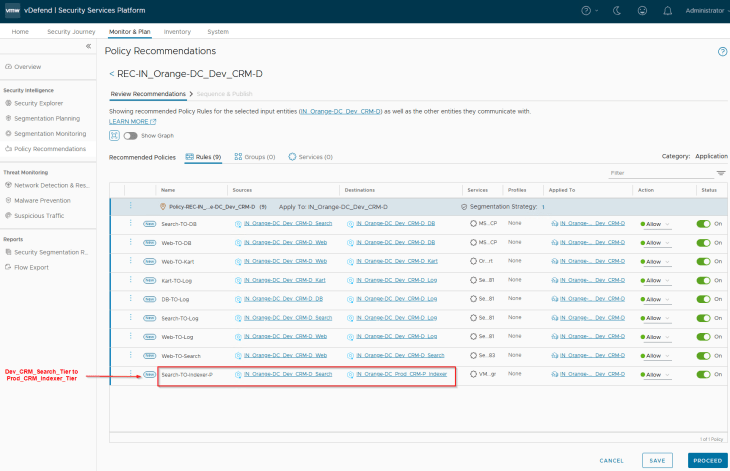
We will include an application segmentation strategy to the recommendations. The selected strategy will include an application-level default rule with an action of ‘Drop’ and will be placed at the bottom of the policy.
The recommendations are generated and published to NSX manager, notice the granular application rule to allow CRM-Dev Search Tier to communicate with the CRM-Prod Indexer Tier (remember, we had application-level exceptions created for this under the environment category)

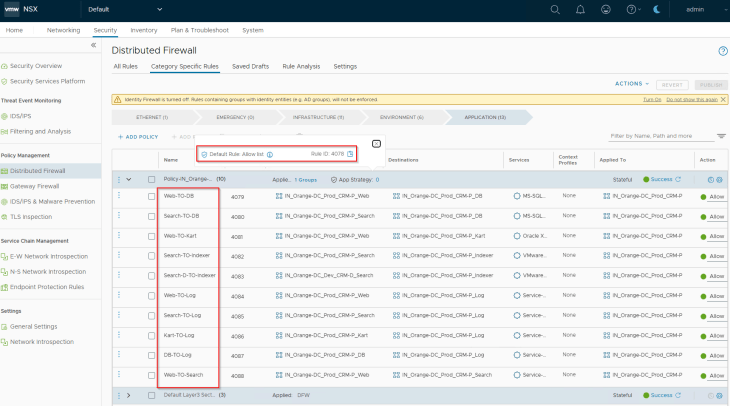
Now since the application rules are in place, we see a drop in unprotected flows for the application
The segmentation strategy default rule is actually a monitored rule. SSP will monitor the flows hitting this default rule that helps to generate incremental recommendations to add additional rules to the application policy over the time.
We will repeat the same steps to run recommendations for the CRM-D application.
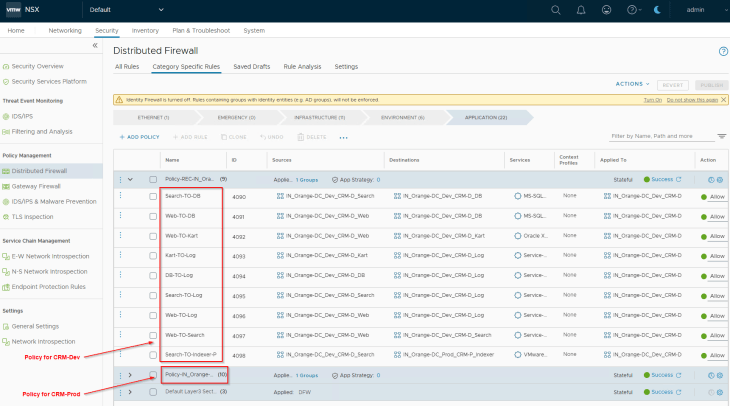
Notice the rule to allow CRM-Dev Search Tier to communicate with the CRM-Prod Indexer Tier (remember, we had application-level exceptions created for this under the environment category)
Now, all the application microsegmentation policies are published to NSX manager with a default application policy level Deny rule (Segmentation Strategy called Application lockdown)
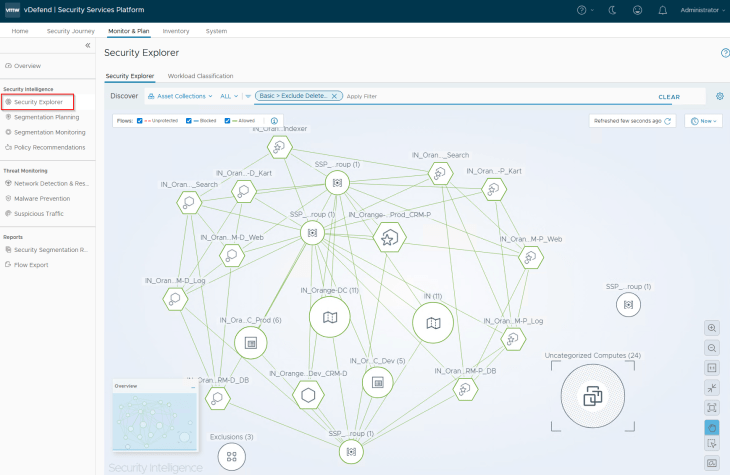
If we check the Security Explorer canvas, we should now see only the protected flows, and we have an improved security posture from where we started in Part 4.
Success!!! We completed another milestone in the segmentation journey, optionally, we could run the segmentation score, to understand where we stand in terms of security posture and what other optimization needs to be planned. Unfortunately, our lab doesn’t have the enough unique flows again, but just FYI
We have now completed the segmentation journey for the two CRM applications onboarded via a full hierarchy import. In the next chapter, we will demonstrate a partial hierarchy import of an Analytics application spanned across two zones in a different environment and re-do the same segmentation exercise to secure the application. Stay tuned!!!
I hope the article was informative. Thanks for reading.

Continue Reading? Here are the other parts of this series:
Part 1: Introduction
https://vxplanet.com/2025/12/18/vdefend-security-services-platform-and-security-segmentation-part-1-introduction/
Part 2: Platform Deployment
https://vxplanet.com/2025/12/19/vdefend-security-services-platform-and-security-segmentation-part-2-platform-deployment/
Part 3: NSX Onboarding and Feature Activation
https://vxplanet.com/2025/12/19/vdefend-security-services-platform-and-security-segmentation-part-3-nsx-onboarding-and-feature-activation/
Part 4: Application Hierarchy Import
https://vxplanet.com/2025/12/22/vdefend-security-services-platform-and-security-segmentation-part-4-application-hierarchy-import/
Part 5: Publishing Assets and Policies
https://vxplanet.com/2025/12/22/vdefend-security-services-platform-and-security-segmentation-part-5-publishing-assets-and-policies/


